Getting Started With Athena
Getting Started With Athena, in this Tutorial one, you can learn about Getting Started With Athena. Are you the one who is looking for the best platform which provides information about Getting Started With Athena? Or the one who is looking forward to taking the advanced Certification Course from India’s Leading AWS Training institute? Then you’ve landed on the Right Path.
The Below mentioned Tutorial will help to Understand the detailed information about Getting Started With Athena, so Just Follow All the Tutorials of India’s Leading Best AWS Training institute and Be a Pro AWS Developer.
If you’ve already signed up for Amazon Web Services (AWS) account, you can start using Amazon Athena immediately.
Sign Up for AWS
When you sign up for AWS, your account is automatically signed up for all services in AWS, including Amazon Athena. You are charged only for the AWS services that you use. When you use Amazon Athena, you use Amazon S3 to store your data. Amazon Athena has no AWS Free Tier pricing.
If you have an AWS account, skip to the next task. If you don’t have an AWS account, please use the following procedure to create one.
To create an AWS account
- Open http://aws.amazon.com/, and then choose to Create an AWS Account.
- Follow the online instructions. Part of the sign-up procedure involves receiving a phone call & entering a PIN using the phone keypad.
Note your AWS Account ID, because you need it for the next task.
Getting Started
This tutorial guides you through using Amazon Athena to query data. You’ll create a table based on sample data stored or loaded data in Amazon Simple Storage Service, query the table, and check the results of the query.
Step 1: Create a Database
You first need to create a database in Amazon Athena.
To create a database
- Open the Athena console.
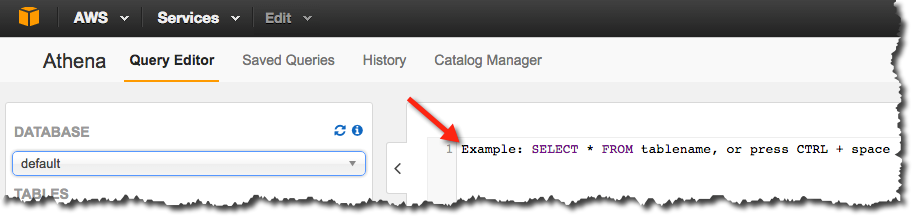
- If this is your first time visiting the Amazon Athena console, you’ll go to a Getting Started page. Click on Get Startedto open the Query Editor. If it isn’t your first time, the Amazon Athena Query Editor opens.
- In an Athena Query Editor, you see a query pane with an example query. Start typing your query anywhere in the query pane.
4. To create a database named sacramento, enter the following CREATE DATABASE statement, and then choose Run Query:
CREATE DATABASE sacramento;
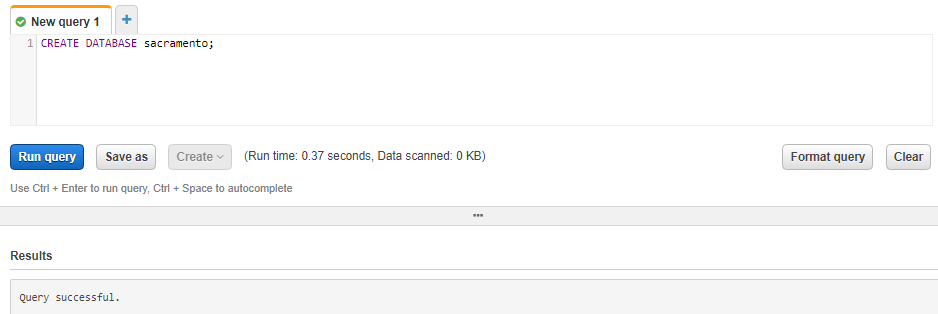
Confirm that the catalog displays refreshes and sacramento appears in the DATABASE list in the Catalog dashboard on the left side.

Step 2: Create a Table
Now that you have a database, you’re ready to create a table that’s based on the sample csv data file.
To create a table
- Make sure that sacramento is select for DATABASEand then choose New Query.
- In the query pane, enter the following CREATE TABLE statement to create table, and then choose Run Query:
Note
You can query data in regions other than the region where you run Athena means it is not regions specific. Standard inter-region data transfer rates for Amazon Simple Storage Service S3 apply in addition to standard Athena charges. To reduce data transfer charges, replace myregion in s3://athena-examples-myregion/path/to/data/ with the region identifier where you run Athena, e.g. s3://athena-examples-us-east-1/path/to/data/.
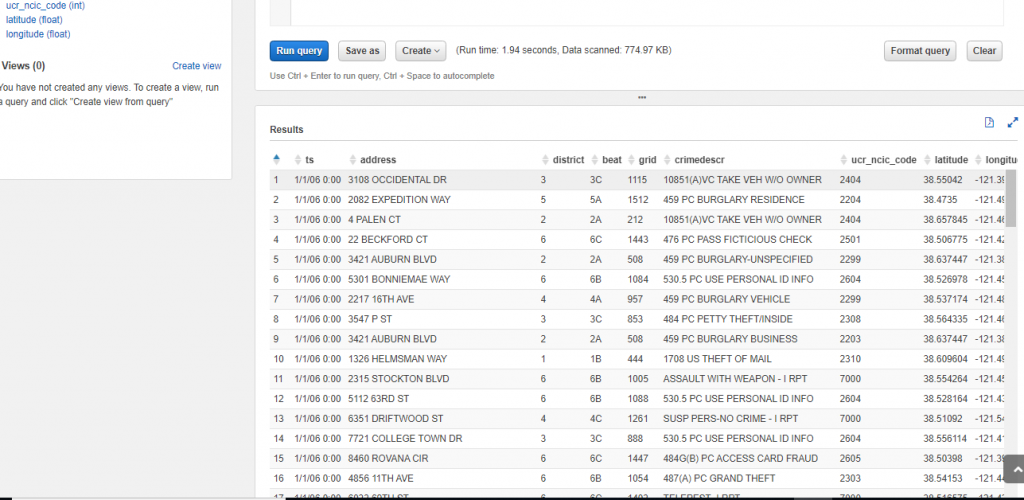
The table crime_data is created and appears in the Catalog dashboard for your database.
Step 3: Query Data
Now that you have the crime_data table created in Athena based on the data in Amazon S3, you can run queries on the table and see the results in Athena.
To run a query
- Choose New Query, enter the following statement anywhere in the query pane, and then choose Run Query:
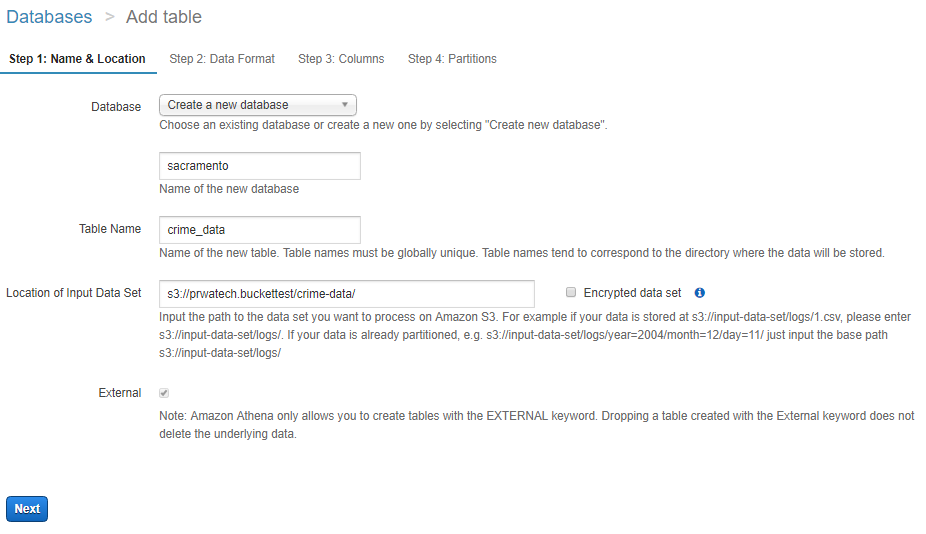
The next step, creating the table, is more interesting: not only does Athena create the table, but it also learns where and how to read the data from my S3 bucket. There’s plenty of work going on behind the hood on this one. I’ve decided to call the table crime_data.

By running above query table crime_data will create under sacramento database.
The EXTERNAL keyword on line one dictates that our data is originating from a source outwith the database, specified by the LOCATION parameter on line 15. This points to the crime-data folder from my S3 bucket. Furthermore, we exclude the first line of our CSV file => consisting of header values =>using TBLPROPERTIES on lines 16–18.
Each attribute from lines 2–10 corresponds to one column in the CSV file, with the first, ts, being timestamps of form “MM/DD/YY HH:MI”. In other words, 1am on January 21st would look like 1/21/06 1:00, whilst 10pm on January 21st would like like 1/21/06 22:00. Given that all data for this file is from January, all the MMs are “1”!
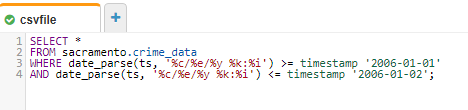
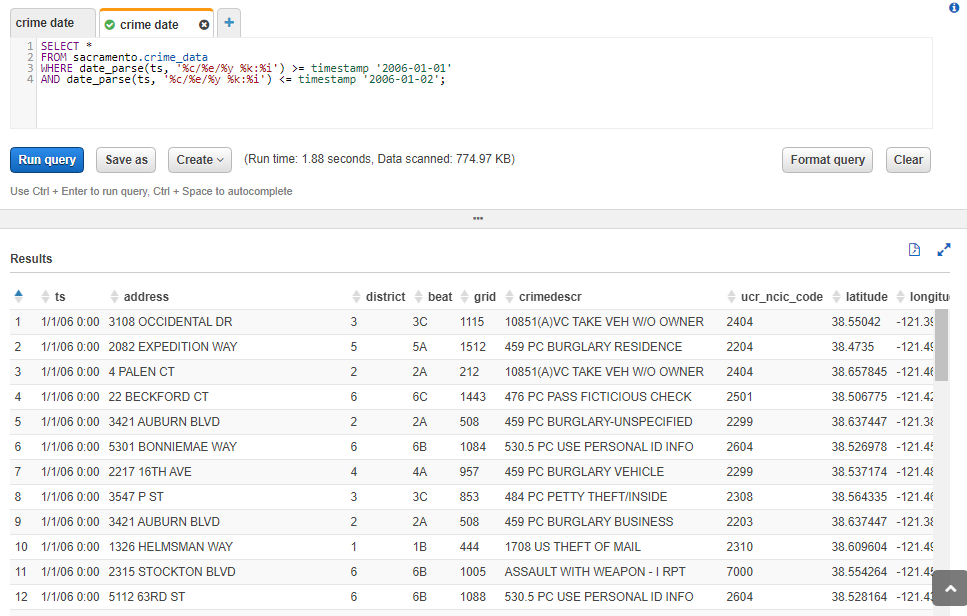
With both database sacramento and table crime_data created, it’s time to analyse the latter to our heart’s content with some SQL SELECT statements. For the sake of demonstrating how this works, let’s write a query to fetch all crimes reported between January 1st and January 2nd in 2006.
As ever with programming, timestamps and dates prove interesting to work with. Critical to dealing with this data is knowing which query engine Athena uses under the hood.
The answer? Presto, an open-source distributed query engine. Following Presto’s documentation on dates and times, we find ourselves parsing the provided timestamps with format specifiers in the form of %c/%e/%y %k: %i
-
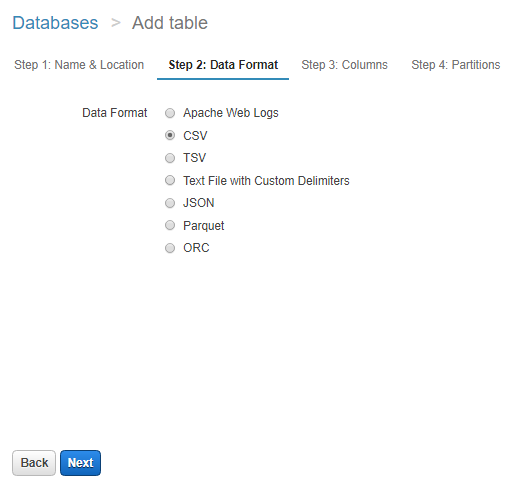
To pull the data which are available in s3 location you have to specify path
Choose the file type loaded in s3 and want to process in Athena
The next step is to run the select query once the data pulled by Athena
Go to the query editor of Amazon Athena
After heating Run Query result are following:
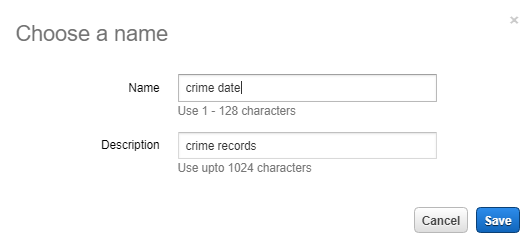
You can save the query to run again
You can also view the results of previous queries or queries that may take some time to complete. Choose History then either search for your query or choose View/Download to view or download the results of previous completed queries. This also displays the status of queries that are currently running. Query history is retain for 45 days for view the results.
Running this query produced the expected results within a couple of seconds:
You can save the output result in the other folder in s3
Accessing Amazon Athena
You can access Amazon Athena using the AWS Management Console, the Amazon Athena API and the AWS CLI.
Using the Console
You can use the AWS Management Console for Amazon Athena to do the following:
To create or select a database.
Create, view, and delete tables.
To Filter tables by starting to type their names.
To Preview tables and generate CREATE TABLE DDL for them.
Show table properties.
To Run queries on tables, save and format queries, and view query history.
Create up to ten queries using different query tabs in the query editor. To open a new query tab, click the plus sign.
To Display query results, save, and export them.
Access the AWS Glue Data Catalog.
View and change settings, such as view the query result location, configure auto-complete, and encrypt query results.
In the right pane, the Query Editor displays an introductory screen that prompts you to create your first table. You can view your tables under Tables in the left pane.
Here’s a high-level overview of the actions available for each table:
To Preview tables– View the query syntax in the Query Editor on the right.
Show properties– Show a table’s name, its location in Amazon S3, input and output formats, the serialization (SerDe) library used, and whether the table has encrypted data.
Delete table– Delete a table.
Generate CREATE TABLE DDL– To Generate the query behind a table and view it in the query editor.
Using the API
Amazon Athena enables application programming for Athena. For more information, see Amazon Athena API Reference. The latest AWS SDKs include support for the Athena API.
For examples of using the AWS SDK for Java with Athena.
Using the CLI
You can access Amazon Athena using the AWS CLI.
#Last but not least, always ask for help!

