Creating pubsub subscription with push type
How to Create a Pub/Sub Push Subscription in Google Cloud
Pub/Sub delivers messages to subscribers in one of two ways. In pull delivery your application connects to Pub/Sub and asks for messages. In push delivery it is the other way round: Pub/Sub sends each message to a web address you provide, as an HTTPS request, and your application simply responds. There is no polling loop to write and no client library to run, only an endpoint that answers requests.
That makes push a natural fit for serverless setups. A Cloud Run service, a Cloud Function or any web application behind a public address can receive messages the moment they are published. It also makes the work of the subscription mostly about the endpoint: how Pub/Sub proves who it is, what response counts as success, and what happens when your endpoint is slow or down.
This guide shows you how to create a push subscription in the console with the original screenshots kept in place, and again with gcloud. Before that, we look at when push is the right choice. Afterwards we cover what your endpoint must return, how to secure it, how retries behave, how to test the whole thing, and then common mistakes and a short FAQ.
Push or Pull: Which Should You Use?
| Point | Push | Pull |
|---|---|---|
| Who starts the request | Pub/Sub sends messages to your endpoint | Your application asks Pub/Sub for messages |
| Endpoint needed | Yes, a publicly addressable HTTPS address | No |
| Best for | Serverless services, webhooks, low volume event handling | High volume processing, batch workers, long running jobs |
| Rate control | Pub/Sub adjusts the delivery rate based on your responses | You control how fast you pull |
| Network setup | Endpoint must be reachable from Pub/Sub | Works from inside a private network |
Note: choose push when your code already lives behind a web address, such as Cloud Run, and message volume is moderate. Choose pull when you need tight control over throughput, or when the consumer cannot be exposed to the internet.
Prerequisites:
- A Google Cloud account with a project that has billing enabled.
- The Pub/Sub API enabled.
- An existing Pub/Sub topic.
- An HTTPS endpoint that can receive POST requests. A Cloud Run service works well. Google’s push guidance expects a publicly addressable address, so confirm the certificate and address requirements in the current documentation before using a custom domain.
- A role that can create subscriptions, such as Pub/Sub Editor.
Create a Push Subscription Using the Console
Menu labels move from time to time, so treat the wording below as a guide.
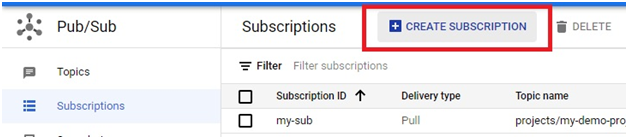
1. Sign in to the Google Cloud console. Open the navigation menu, choose Pub/Sub and then Subscriptions.
2. Click Create subscription.
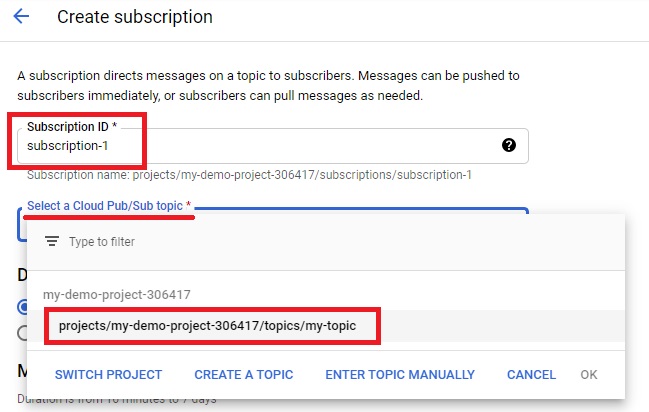
3. Enter a subscription ID, such as orders-push-sub.
4. Select the topic the subscription should read from.
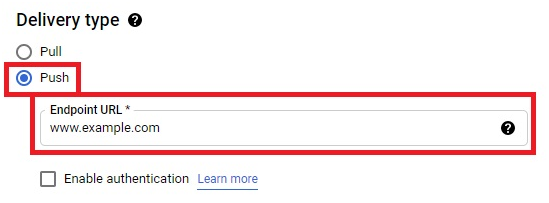
5. Set the delivery type to Push.
6. Enter the endpoint URL where Pub/Sub should send messages, for example https://my-service.example.com/push. If you want Pub/Sub to prove its identity, enable authentication and choose a service account.
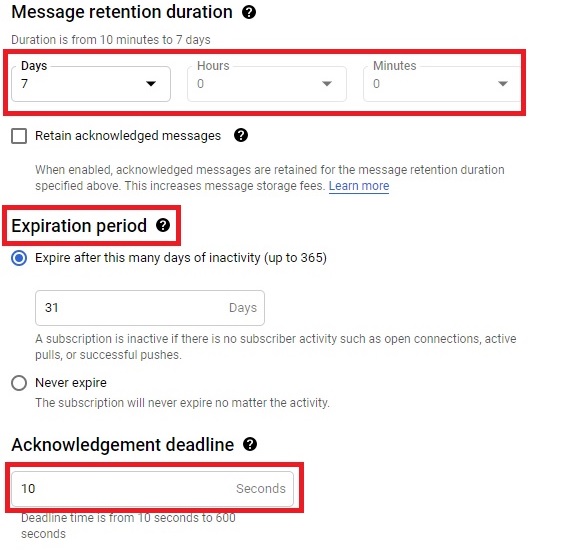
7. Set the message retention duration and the subscription expiration period. Retention decides how long unacknowledged messages are kept.
8. Set the acknowledgement deadline. This is how long your endpoint has to respond before Pub/Sub treats the message as failed and sends it again. A push endpoint should respond quickly.
9. Click Create. The push subscription appears in the list.
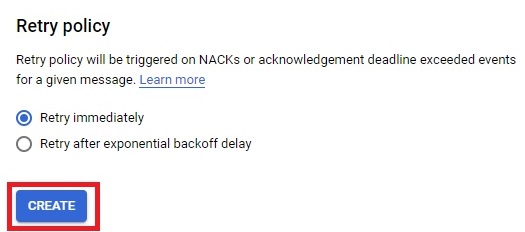
Create a Push Subscription With gcloud
gcloud pubsub subscriptions create orders-push-sub –topic=orders-topic –push-endpoint=https://my-service.example.com/push –ack-deadline=30
To have Pub/Sub send a signed identity token with each request, add a service account and an audience:
gcloud pubsub subscriptions create orders-push-sub –topic=orders-topic –push-endpoint=https://my-service.example.com/push –push-auth-service-account=pubsub-push@my-project.iam.gserviceaccount.com –push-auth-token-audience=https://my-service.example.com
Your endpoint should verify that token before it trusts the request. Check Google’s authentication guide for the service account roles needed, since Pub/Sub must be allowed to create tokens for that account.
What Your Endpoint Must Return
Pub/Sub decides whether delivery worked from the HTTP status code your endpoint returns.
- Success: the codes 200, 201, 202, 204 and 102 acknowledge the message.
- Failure: any other status code, or no response before the acknowledgement deadline, counts as a failure and Pub/Sub sends the message again.
The most common bug is an endpoint that does its work, then crashes or times out before replying. Pub/Sub sees a failure and resends, and your work runs twice. Acknowledge as soon as the message is safely handled, and make your processing safe to repeat.
By default the request body is a JSON document that wraps the message. The data field is base64 encoded, and the document also carries the message ID, publish time, attributes and subscription name. A small handler in Python looks like this:
import base64
from flask import Flask, request
app = Flask(__name__)
@app.route(“/push”, methods=[“POST”])
def receive():
body = request.get_json()
message = body[“message”]
data = base64.b64decode(message.get(“data”, “”)).decode(“utf-8”)
print(“Received:”, data, message.get(“attributes”))
return (“”, 204)
Returning 204 tells Pub/Sub the message was handled.
How Retries and Delivery Rate Behave?
- Backoff on failure. When messages are not acknowledged, Pub/Sub backs off with exponential delays between 100 milliseconds and 60 seconds. This is built in and cannot be turned off.
- Retry policy. A separate retry policy on the subscription can add its own delay. The longer of the two applies.
- Delivery rate adjusts itself. Pub/Sub speeds up when your endpoint answers well and slows down when it fails or responds slowly.
- To stop deliveries for a while, switch the subscription to pull. To resume, set the endpoint URL again. To stop for good, delete the subscription.
Test It
- Create a topic, a subscription and a reachable endpoint such as a Cloud Run service running the handler above.
- Publish a message:
gcloud pubsub topics publish orders-topic –message=”hello push”
- Check your endpoint logs. You should see the message within a few seconds.
- Return a failing status code on purpose, and watch the same message arrive again with a growing delay. That confirms retries are working.
Common Mistakes to Avoid
- Returning the wrong status code. Anything outside the success codes triggers a resend.
- Slow endpoints. Work that takes longer than the acknowledgement deadline leads to duplicates. Acknowledge fast, then process in the background if needed.
- Skipping authentication. An open endpoint accepts requests from anyone. Enable a service account token and verify it.
- Forgetting duplicates. Pub/Sub delivers at least once, so your handler must handle the same message twice.
- Using a private address. Push needs an address Pub/Sub can reach. Private endpoints need a different design.
- Copying commands with curly quotes or a long dash. Pasting from a web page can change the double dash before a flag into a single long character. Type the flags by hand if a command fails oddly.






