GKE Preemptible VM node pool
Managing GKE Node Pools With Preemptible and Spot VMs
Running a Kubernetes cluster is mostly a question of paying for compute that sits waiting for work. Batch jobs, CI runners, data processing and test environments rarely need machines that stay up for months, yet many teams run them on the same standard nodes as their production services. Google Kubernetes Engine gives you a way to cut that bill sharply: build a node pool out of discounted virtual machines that Google can reclaim when it needs the capacity back.
Those discounted machines come in two flavours. Preemptible VMs are the older option and live for at most 24 hours. Spot VMs are the newer one, with the same deep discount but no fixed expiry, and they are what Google now steers you towards. In both cases the node pool behaves like any other from the outside. Pods get scheduled on it, the autoscaler can grow and shrink it, and you manage it with the same commands. The difference is that any node in it can disappear with about 30 seconds of warning.
That trade is a very good one when your workload can handle a restart, and a very bad one when it cannot. This guide shows you how to create a Spot or preemptible node pool in GKE using both the gcloud command line and the Google Cloud console, then goes beyond the clicks to cover the part that decides whether the savings are worth it: how to steer the right pods onto cheap nodes, how to keep system workloads safe, and how to design for the day a node is reclaimed.
Here is the route we will take. First a quick comparison of Spot and preemptible VMs, then the prerequisites, then the gcloud commands. After that comes the console walkthrough with every original screenshot in place, followed by pod scheduling with labels and taints, interruption handling, a list of limits to know, common mistakes and a short FAQ.
Spot VMs and Preemptible VMs Compared
Both are Compute Engine VMs sold at a large discount in exchange for the right to stop them at any time. Google has described discounts of up to roughly 60 to 91 percent depending on machine type and region, but the exact figure changes, so check the current pricing page for your region before you quote a number to anyone.
| Point | Preemptible VM | Spot VM |
|---|---|---|
| Lifetime | Stopped by Google after 24 hours at most | No fixed expiry, runs until Google needs the capacity |
| Termination notice | About 30 seconds | About 30 seconds |
| Status | Still supported in GKE, older option | Recommended by Google for new node pools |
| Node label | cloud.google.com/gke-preemptible=true |
cloud.google.com/gke-spot=true |
| Best for | Short batch work you already run on preemptible | Fault tolerant batch, CI, data processing, stateless services with spare replicas |
My advice: unless you have a specific reason to stay on preemptible, create new pools as Spot. The 24 hour ceiling on preemptible nodes means every node is guaranteed to be recycled daily, which is one more restart your workloads have to survive.
Prerequisites:
- A Google Cloud account with a project that has billing enabled.
- The Kubernetes Engine API enabled in that project.
- An existing GKE cluster. This guide uses one named gke-cluster-1 in the zone us-central1-c, so swap in your own names.
- Permission to create node pools, for example the Kubernetes Engine Admin role.
- Cloud Shell or a local installation of the gcloud CLI.
One planning point before you start: keep at least one standard node pool in the cluster. System components such as DNS need to stay up, and a cluster made entirely of reclaimable nodes can lose them all at once.
Create a Spot or Preemptible Node Pool With gcloud
The command line is the quickest route, and it is easier to repeat or script than clicking through the console. To create a preemptible node pool, add the preemptible flag:
gcloud container node-pools create preemptible-pool –preemptible –cluster gke-cluster-1 –zone us-central1-c

To create the same pool with Spot VMs instead, swap the flag:
gcloud container node-pools create spot-pool –cluster=gke-cluster-1 –zone=us-central1-c –spot
Once the command finishes, confirm the pool exists and check its nodes:
gcloud container node-pools list –cluster=gke-cluster-1 –zone=us-central1-c
kubectl get nodes –selector=cloud.google.com/gke-spot=true
If the second command lists your new nodes, the label is present and your pool is ready to receive workloads. For preemptible pools, use cloud.google.com/gke-preemptible=true as the selector.
Create the Node Pool Using the Console
If you prefer clicking, the console walks you through the same settings. Menu names move around from time to time, so treat the exact wording below as a guide.
1. In the Google Cloud console, open Kubernetes Engine and choose Clusters. Click the name of the cluster you want to extend.
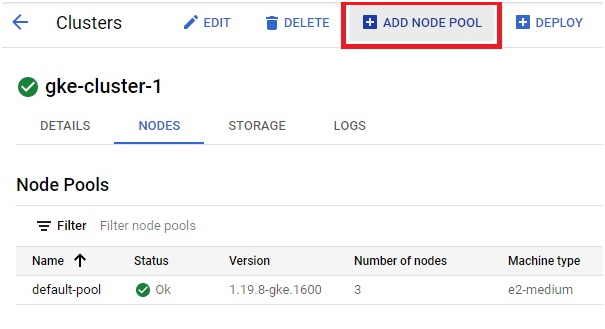
2. Click Add node pool at the top of the cluster page.
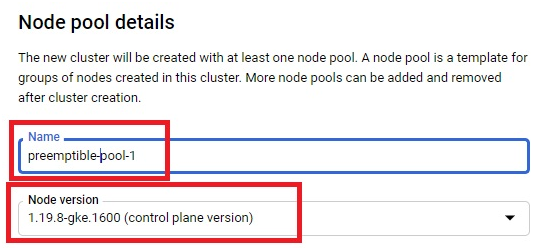
3. Under Node pool details, give the pool a clear name such as spot-pool and choose the node version. Leave it on the cluster default unless you have a reason to pin it.
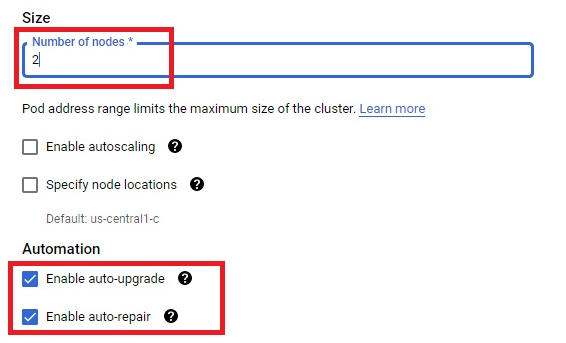
4. Set the number of nodes, then decide on auto upgrade, auto repair and autoscaling. For a Spot pool, autoscaling is worth switching on, because the autoscaler can replace reclaimed capacity.
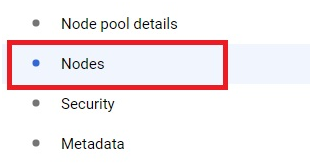
5. In the left navigation of the node pool form, select Nodes.
6. Under machine configuration, pick the machine family and type, then tick the option to use Spot VMs. In older versions of the console this option was labelled preemptible nodes, so use whichever your console shows.
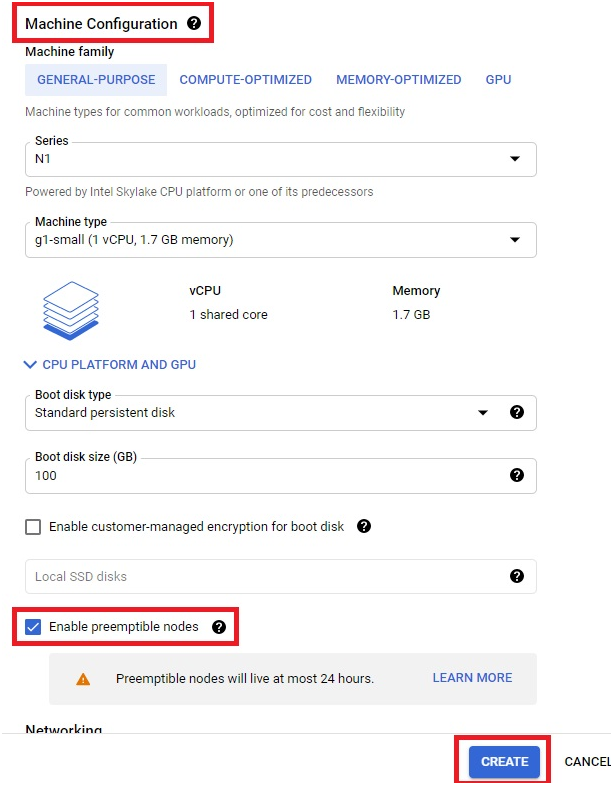
7. Click Create. The pool takes a couple of minutes to come up, and then appears in the node pool list of your cluster.
A note for Windows workloads: Google documents that Windows Server node pools are not supported for preemptible VMs, so do not plan on that combination.
Send the Right Pods to Spot Nodes
Creating the pool is the easy half. Without further setup, Kubernetes will schedule any pod on any node with room, which means your critical services might land on reclaimable nodes while your batch jobs sit on expensive ones. You have two tools to control this.
Option 1: Node selector
Every Spot node carries a label. Add a node selector to the pod spec, and the pod will only run on Spot nodes:
nodeSelector:
cloud.google.com/gke-spot: “true”
Option 2: Taint the pool and add tolerations
A selector pulls pods towards Spot. A taint does the opposite job: it keeps everything off the pool unless the pod explicitly opts in. That protects you from an unrelated deployment landing there by accident. Add the taint when you create the pool:
gcloud container node-pools create spot-pool –cluster=gke-cluster-1 –zone=us-central1-c –spot –node-taints=cloud.google.com/gke-spot=”true”:NoSchedule
Then give the pods that belong there a matching toleration, together with the selector:
tolerations:
– key: cloud.google.com/gke-spot
operator: Equal
value: “true”
effect: NoSchedule
nodeSelector:
cloud.google.com/gke-spot: “true”
Taint plus selector is the combination I would use in practice. The taint keeps the wrong pods out, and the selector keeps the right pods in.
Design Workloads for Interruption
When Google reclaims a node, Kubernetes gets about 30 seconds of notice. Preemptible nodes have a further limit: Google documents that non system pods get a graceful shutdown window of only around 15 seconds. Whatever your pods need to do before stopping has to fit inside that.
- Run more than one replica.One lost node should never mean a lost service.
- Keep state off the node.Use external storage or a database, never local disk, for anything you cannot recreate.
- Make jobs restartable.Checkpoint long batch work so a restart picks up where it stopped.
- Handle SIGTERM.Finish in flight requests and stop cleanly when the signal arrives, and keep terminationGracePeriodSeconds short enough to be honoured.
- Spread pods across zones.Capacity is reclaimed per zone, so a multi zone pool lowers the odds that every node goes at once.
- Keep a standard pool.Run system workloads and anything intolerant of restarts there.
Things to Know Before You Rely on It
- The Spot or preemptible setting is chosen when the pool is created. As far as I know an existing standard pool cannot be switched, so create a new pool and migrate workloads to it.
- There is no availability guarantee. If Google has no spare capacity in your zone, nodes may fail to create or may be reclaimed quickly.
- A GPU Spot pool needs an existing standard pool without GPUs in the cluster.
- The gke-spot label is available on newer GKE versions. On older ones, check which labels your nodes actually carry with kubectl before writing selectors.
- Ordinary Compute Engine quotas still apply to Spot and preemptible nodes.
Common Mistakes
- Putting every node on Spot.The cluster then has no stable home for DNS and other system pods.
- Skipping the taint.Without it, anything can land on a reclaimable node.
- Copying commands with curly quotes or a long dash.Pasting from a web page can turn the double dash before a flag into a single long character, and gcloud will reject it. Type the flags by hand if a command fails oddly.
- Mixing up zone and region.The commands above use a zone. If your cluster is regional, use the region flag instead.
- Assuming a nightly restart is harmless.On preemptible pools, every node is recycled within 24 hours, so test that your workload survives it.
Spot and preemptible node pools are one of the quickest ways to bring a GKE bill down, as long as you put the right workloads on them. Start with one non critical batch job, watch how it behaves through a few node reclaims, and widen from there.






