Creating Autopilot GKE cluster.
How to Create a GKE Autopilot Cluster in Google Cloud
Kubernetes is powerful, but running it well is a lot of work. Someone has to choose machine types, size node pools, schedule upgrades, patch operating systems and keep an eye on capacity. For many teams that work has nothing to do with the product they are actually building. Autopilot mode in Google Kubernetes Engine, usually shortened to GKE, exists to take that burden away.
In Autopilot, Google manages the whole cluster infrastructure for you. That covers creating nodes, scaling them up and down, repairing and upgrading them, and applying a hardened security setup. You describe your workloads in normal Kubernetes manifests and GKE finds somewhere to run them. Google’s own documentation calls Autopilot the recommended way to use GKE, so it is a sensible starting point for anyone new to the platform.
The billing model is different too. In the standard Autopilot model you pay for the resources your Pods request rather than for whole virtual machines that may sit half empty. That makes the cost easier to connect to what you actually deploy, but it also means you must set resource requests properly, which we will cover later.
This guide takes you from zero to a running cluster. We start with what Autopilot is and how it differs from Standard mode, then list what you need, then create a cluster through the Google Cloud console with every original screenshot in place. After that we repeat the job with gcloud, connect with kubectl, deploy a test workload, and finish with the limits to know, common mistakes, a short FAQ and how to clean up.
Autopilot and Standard Compared
GKE offers two operating modes. In Standard you build and manage node pools yourself. In Autopilot, GKE does it for you and enforces a set of good practices. The table shows the differences that matter most when you are deciding.
| Point | Autopilot | Standard |
|---|---|---|
| Cluster location | Regional only | Regional or zonal |
| Nodes | Managed by GKE, no node pools to create | You create and manage node pools |
| Billing | Mostly based on Pod resource requests | You pay for node capacity whether or not Pods use it |
| Node operating system | Container Optimized OS with containerd only | Container Optimized OS by default, Ubuntu or Windows Server optional |
| Privileged workloads | Go through admission controls and allowlists | GKE does not block them automatically |
| Networking defaults | VPC native with Dataplane V2 and network policy on | VPC native, Dataplane V2 and network policy optional |
| Cloud Marketplace apps | Not supported | Supported |
| Upgrades and repairs | Automatic and preconfigured | Automatic on release channels, more options to tune |
My advice: pick Autopilot when you want the least operational work and your workloads are standard containers. Pick Standard when you need node level control, such as privileged agents, special machine types or a specific node operating system.
Prerequisites:
- A Google Cloud account with a project that has billing enabled.
- The Kubernetes Engine API enabled in that project. The console offers to enable it the first time you open Kubernetes Engine.
- A role that can create clusters, for example Kubernetes Engine Admin.
- A VPC network. The default network works for a first cluster.
- For the command line steps, Cloud Shell or a local gcloud installation, plus kubectl.
Create an Autopilot Cluster Using the Console
Menu labels move around from time to time, so use the wording below as a guide rather than an exact script.
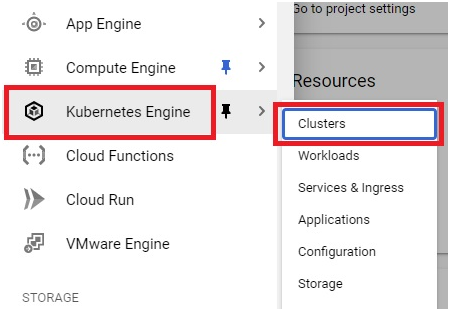
1. Sign in to the Google Cloud console. Open Menu > Kubernetes Engine > Clusters.
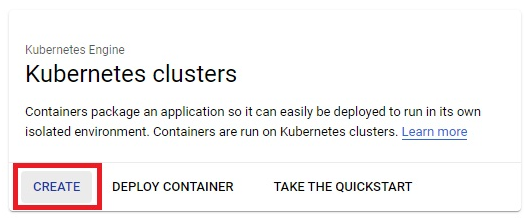
2. Click Create at the top of the Clusters page.
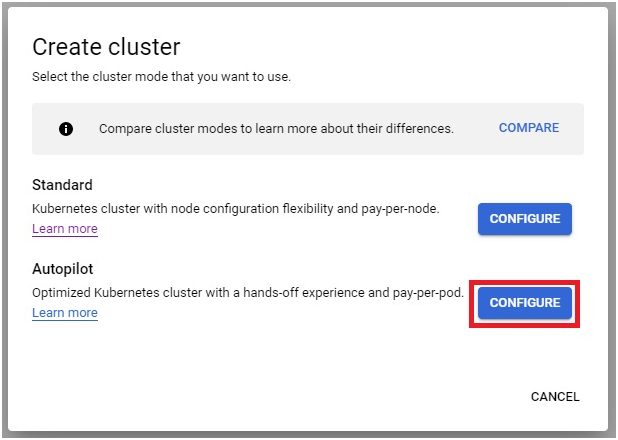
3. The console asks which mode you want. Next to Autopilot, click Configure.
4. Enter a cluster name, for example autopilot-cluster-1, and choose a region. Pick the region closest to your users or your data, because Autopilot clusters are regional and the region cannot be changed later.
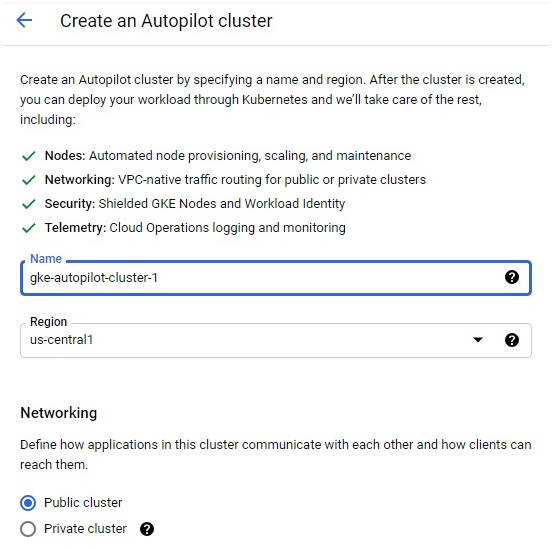
5. Review the networking section. Choose whether the cluster should be reachable from the public internet or kept private, and select the network. The default network is fine for a first cluster, or pick your own VPC if you have one.
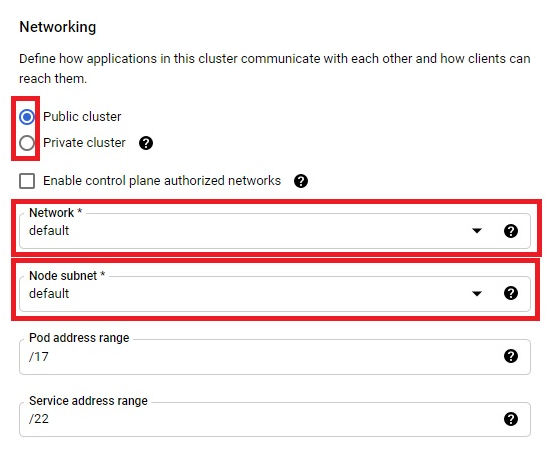
6. Leave the remaining settings on their defaults for now and click Create.
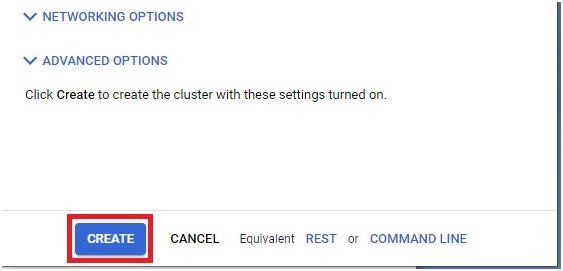
7. Wait a few minutes. When the green tick appears next to the cluster name, the Autopilot cluster is ready.
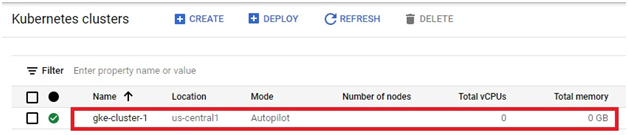
Do not be alarmed if the cluster shows no usable nodes yet. A new Autopilot cluster starts with none and creates nodes only when you deploy Pods, so the first workload takes a little longer to start.
Create the Same Cluster With gcloud
The command line is quicker to repeat and easier to put in a script. One command creates the cluster:
gcloud container clusters create-auto autopilot-cluster-1 –region=us-central1
Then fetch credentials so kubectl can talk to it:
gcloud container clusters get-credentials autopilot-cluster-1 –region=us-central1
Check that the cluster responds:
kubectl get namespaces
Notice that the command uses a region, not a zone. That is deliberate, because Autopilot clusters are regional.
Deploy a Test Workload
A quick deployment proves everything works and shows Autopilot creating a node for you. This manifest sets resource requests, which Autopilot uses for both scheduling and billing:
apiVersion: apps/v1
kind: Deployment
metadata:
name: hello
spec:
replicas: 2
selector:
matchLabels:
app: hello
template:
metadata:
labels:
app: hello
spec:
containers:
– name: hello
image: us-docker.pkg.dev/google-samples/containers/gke/hello-app:1.0
resources:
requests:
cpu: 250m
memory: 512Mi
Save it as hello.yaml, apply it, and watch the Pods and nodes appear:
kubectl apply -f hello.yaml
kubectl get pods
kubectl get nodes
Pods may sit in Pending for a minute while Autopilot provisions capacity, and then they start running. The kubectl get nodes output now lists a node that did not exist before you deployed.
How Autopilot Billing and Security Work
- Billing follows requests.In the Pod based model you pay for the CPU, memory and storage your Pods request. Requests that are too large waste money, and requests that are too small cause throttling. Check the current GKE pricing page for rates, because they change.
- Hardened by default.Nodes use a locked down configuration and receive security patches automatically within your maintenance schedule.
- Network controls are on.Dataplane V2 is enabled by default, so network policies work without extra setup.
- Release channel.New Autopilot clusters enrol in the Regular release channel by default.
Things to Know Before You Commit
- Autopilot clusters are regional only. You cannot choose a zonal cluster.
- Google marks several preconfigured settings as impossible to change or disable. Read the feature comparison page for your use case before building anything large.
- Cloud Marketplace applications are not supported in Autopilot.
- Privileged workloads need to pass admission controls and allowlists, so some monitoring and security agents may not run unless the vendor is approved.
- You cannot SSH into nodes or manage them directly.
Common Mistakes to Avoid
- Leaving out resource requests.Autopilot applies defaults and your bill follows them. Set requests deliberately.
- Using a zone in commands.Autopilot needs a region flag, so a zone value will be rejected.
- Expecting nodes straight away.A new cluster has no usable nodes until you schedule Pods.
- Copying commands with curly quotes or a long dash.Pasting from a web page can change the double dash before a flag into a single long character. Type the flags by hand if a command fails oddly.
- Forgetting to delete a test cluster.Running Pods keep billing, so clean up as soon as you finish experimenting.
You now have an Autopilot cluster running and know how it differs from Standard mode. From here, the natural next steps are deploying a real application, setting sensible resource requests, and then trying Spot capacity for fault tolerant jobs.






