Load Balancing
How to Set Up HTTP Load Balancing on Google Cloud
Every website or application eventually hits the same problem. One server cannot handle all the traffic, and if that one server fails, everything goes down with it. A load balancer solves both problems. It sits in front of several identical servers, shares incoming requests between them, and quietly stops sending traffic to any server that stops responding.
Google Cloud gives you a managed load balancer that does this without you running any load balancing software. You create the pieces in the console: a group of virtual machines, a health check that decides which machines are healthy, a backend service that points at the group, and a frontend that gives users one address to visit. Google then spreads the traffic for you and scales the load balancer itself as demand grows.
In this guide you will build a complete HTTP load balancer from scratch. We begin with when load balancing is the right tool and which type to choose. Then we build an instance group with a template and a startup script that installs the Apache web server, set up autoscaling, open the firewall, and create the load balancer with its backend, health check and frontend. Every original screenshot stays in place. At the end you will find a short section on load balancing inside Google Kubernetes Engine, plus common mistakes, a short FAQ and how to clean up.
When to Use Load Balancing
Reach for a load balancer when any of these are true:
- One server is no longer enough for your traffic.
- You cannot afford downtime if a single machine fails.
- Your traffic rises and falls and you want machines added and removed automatically.
- You want one stable address for users while servers change behind it.
Google Cloud offers several load balancer types. The right one depends on the traffic you carry and who sends it.
| Type | Works with | Use it for |
|---|---|---|
| Application Load Balancer | HTTP and HTTPS traffic | Websites and web applications, the type built in this guide |
| Proxy Network Load Balancer | TCP traffic with a proxy | Non HTTP services that need global reach or SSL offload |
| Passthrough Network Load Balancer | TCP, UDP and other protocols, regional | Services that need the client IP kept or non web protocols |
| Internal load balancers | Traffic inside your VPC network | Private services that only other systems call |
The console names for these types have changed over the years, so confirm the exact labels in your project. This guide builds an external HTTP load balancer, which is the usual choice for a public website.
Prerequisites:
- A Google Cloud account with a project that has billing enabled.
- The Compute Engine API enabled in that project.
- A role that can create instances, firewall rules and load balancers, such as Compute Admin and Network Admin.
- Time to clean up afterwards. Load balancers and instances bill while they exist.
Step by Step Process of Setting Up HTTP Load Balancing
Step 1: Create the Instance Group
An instance group is the set of identical virtual machines that will sit behind the load balancer. A managed instance group creates them from a template, which is what lets Google add and remove machines automatically.
- In the console, open Compute Engine and then Instance groups. Click Create instance group.
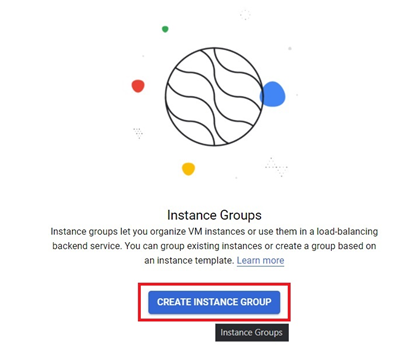
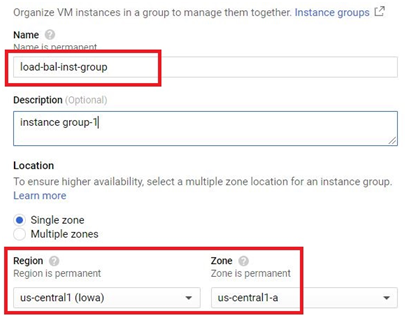
- Give the group a name, and choose the region and zone.
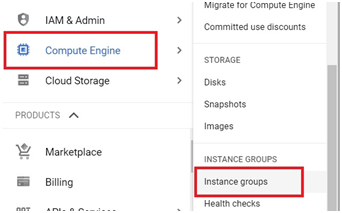
Click on Create Instance Group
Give a name for instance group.
Select the Region and Zone
Step 2: Create the Instance Template
The template is the blueprint every machine in the group is built from.
- Under Instance template, choose to create a new template.
- Set the machine configuration. A small machine type is enough for this exercise.
- In the firewall section, allow HTTP traffic so that web requests can reach the machines.
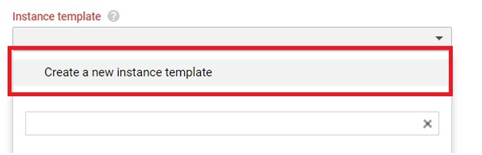
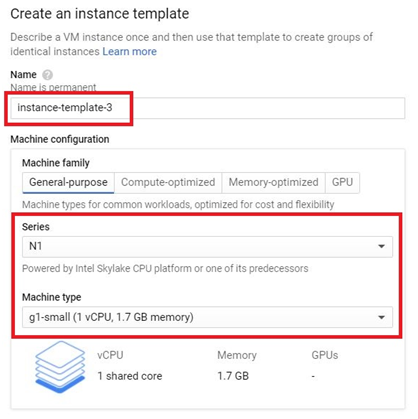
Give a new Instance Template.
Choose the Specification for instance template.
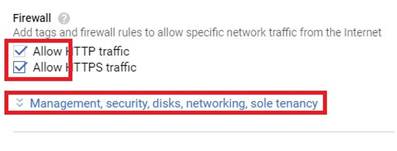
In firewall, Tick Allow.
Click Management, security, disks, networking, sole tenancy
Step 3: Add the Startup Script
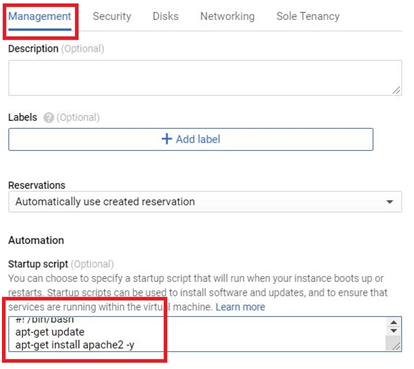
Under the Management section, paste a startup script. It runs when each machine boots and installs the Apache web server, so every machine in the group serves a web page without you logging in to any of them.
#! /bin/bash
apt-get update
apt-get install apache2 -y
Tip: make each machine show its own name on the default page, so you can see the load balancer sharing requests. Add this line after the install line:
echo “Served by $(hostname)” > /var/www/html/index.html
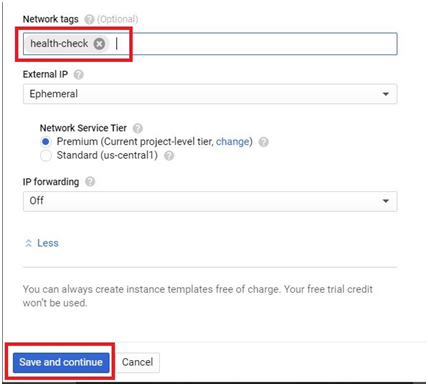
Step 4: Set the Network Tag
- Under Networking, add a network tag such as http-server. Firewall rules use this tag to find your machines.
- Click Save and continueto finish the template.
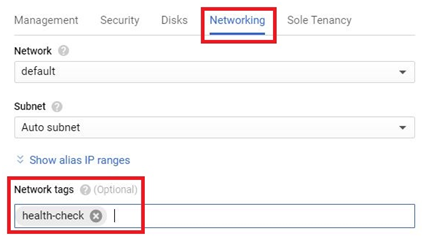
Then Click Save and Continue
Step 5: Configure Autoscaling
Autoscaling lets the group add machines when they are busy and remove them when they are idle. That keeps cost down and capacity up.
- Set the autoscaling mode to scale automatically, and choose CPU utilisation as the signal.
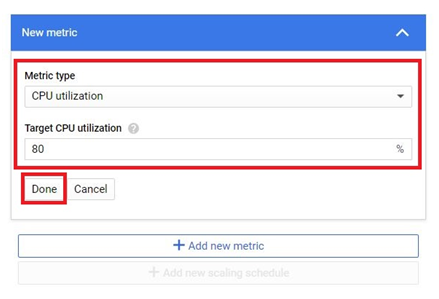
- Set a target percentage, for example 60 percent, and click Done.
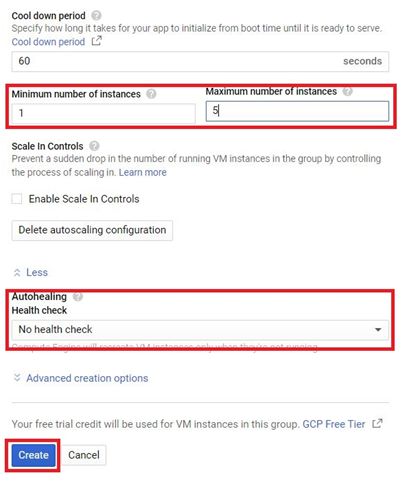
- Set the minimum and maximum number of instances. Two and four are fine for a test.
- For autohealing, choose no health check for now, since the load balancer will have its own. Then click Create.
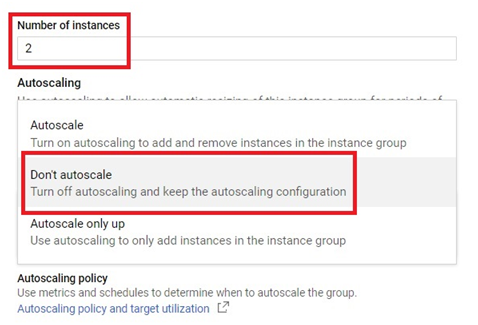
Give the metric type as CPU Utilization and give the target percentage.
Click Done.
Give the minimum and maximum number of instances. In autohealiing, Give No health Check.
Then Click Create.
Step 6: Map the Port Name
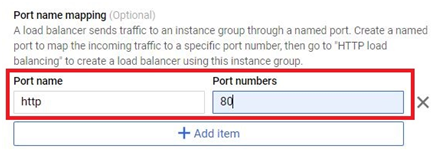
The load balancer finds the right port on your machines through a named port. You attach the name http to port 80 on the instance group.
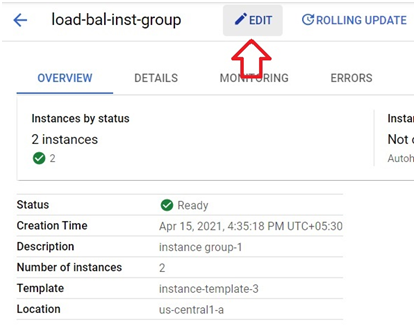
- Open the new instance group and click Edit.
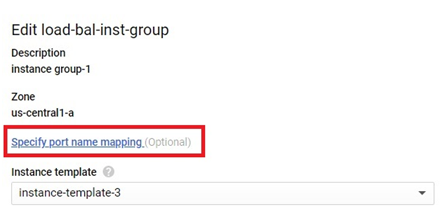
- Find Specify port name mapping.
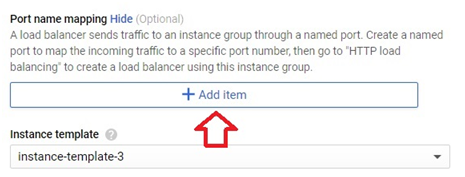
- Add the name http with the port number 80.
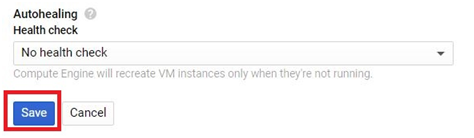
- Click Save.
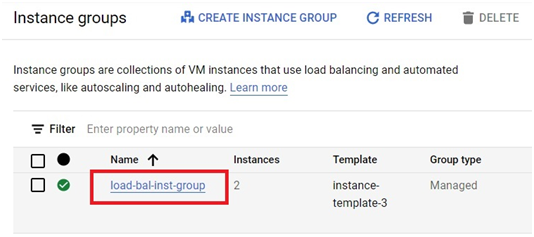
Edit.
Click on Specify port name mapping.
Click on Add item.
Give the port name as http and port number as 80.
Save.
Step 7: Create the Firewall Rule
A firewall rule lets web traffic and the health check probes reach your machines.
- Open VPC network and then Firewall, and click Create firewall rule.
- Give the rule a name, and set the target tag to the one you added to the template.
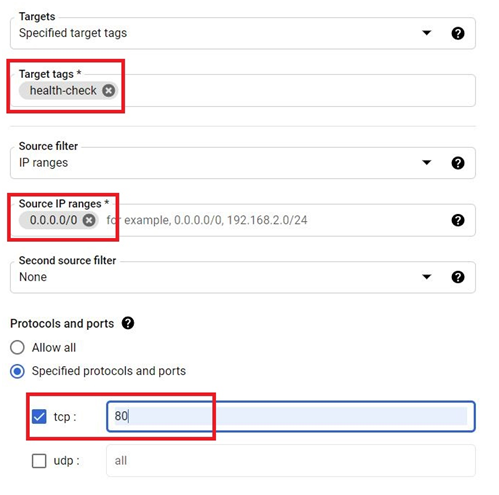
- For source IP ranges, add the health check ranges 130.211.0.0/22 and 35.191.0.0/16, and the range of the users you want to allow. Use 0.0.0.0/0 only for a public test site.
- Allow TCP port 80 and click Create.
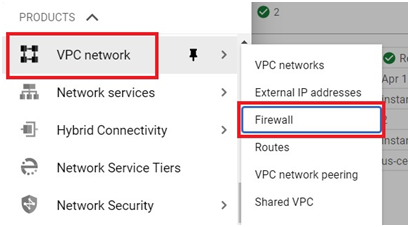
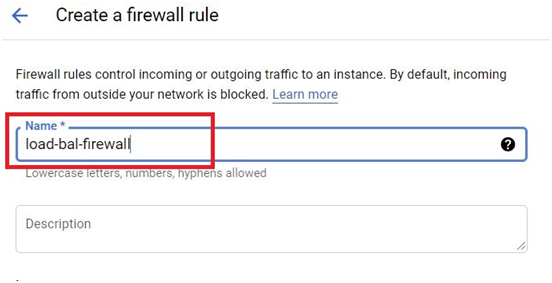
on create Firewall.
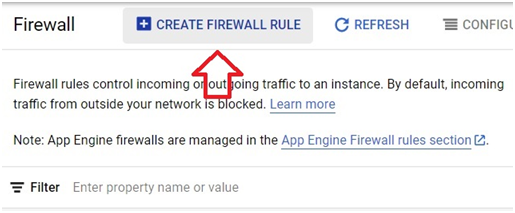
Give the name for firewall
the target tags.
Give the Source IP ranges
Select the tcp and give port number as 80
Step 8: Reserve a Static IP Address
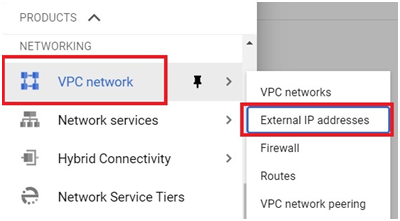
A static address gives your load balancer a front door that never changes. Reserve one in the console under VPC network and then IP addresses.
- Open the external IP addresses page.
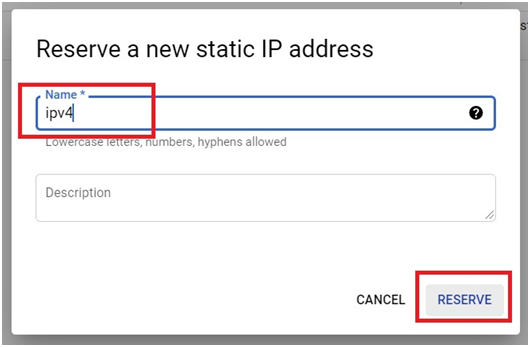
- Reserve a new static address, give it a name and click Reserve.
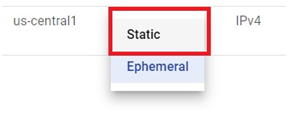
In the Type, Click on Ephemeral.
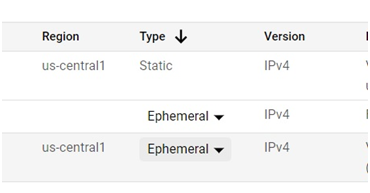
Change it into static.
Give the name for static and Click reserve.
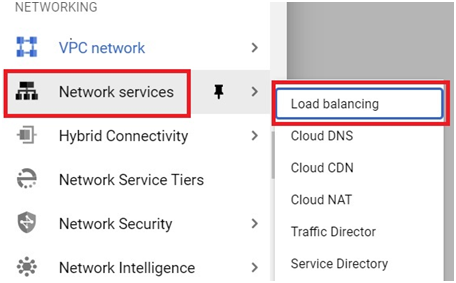
Click on network services > Load balancing
Check: reserve this address as its own resource, not by converting a virtual machine address, and select it later in the frontend configuration. Converting a machine address would keep the machine address, not the load balancer address.
Step 9: Create the Load Balancer
- Open Network services and then Load balancing, and click Create load balancer.
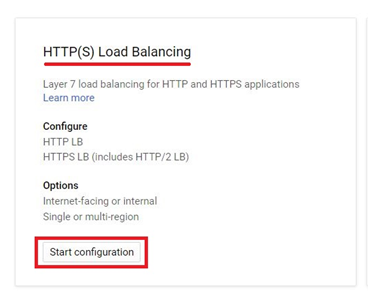
- Choose the HTTP and HTTPS option and click Start configuration.
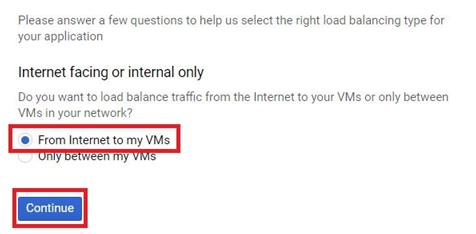
- Choose From internet to my VMs, which means the traffic comes from the public internet.
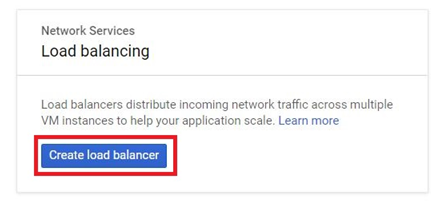
In HTTP load balancing, Click on Start configuration
Select From internet to my VM’s and Click Continue.
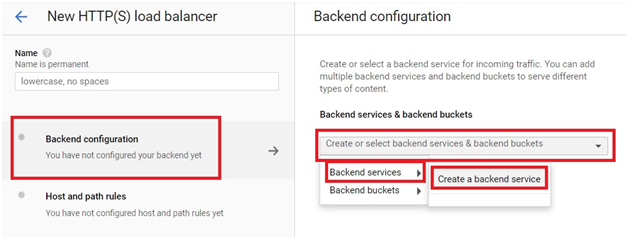
In the Backend Configuration. Select Backend Services > Create a backend service.
Step 11: Add a Health Check
The health check is how the load balancer knows which machines are working. It sends a small request to each one and stops sending traffic to any that fail to answer.
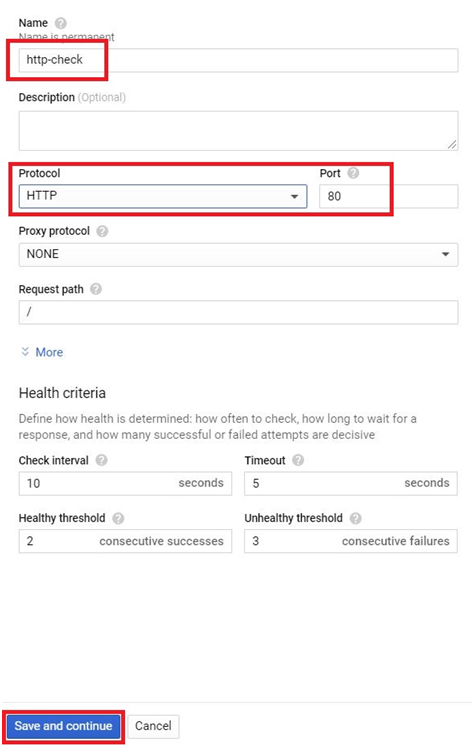
- Create a new health check, choose the HTTP protocol and port 80.
- Click Save and continue, then Create.
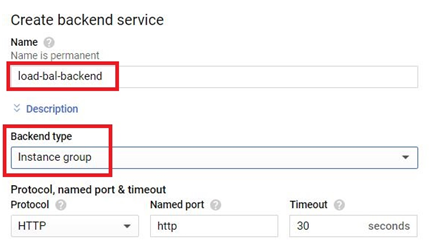
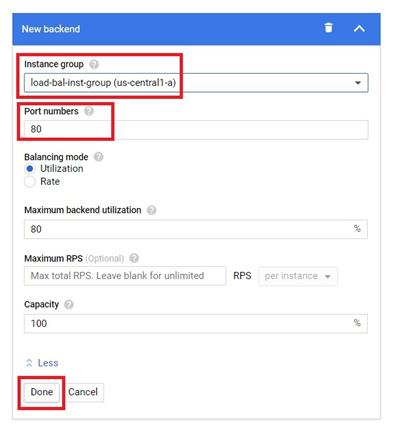
Select the created Instance Group. Give the port number as 80.
Click Done.
Step 12: Configure the Frontend
- Open the frontend configuration, give it a name and set the protocol to HTTP.
- Select the static IP address you reserved earlier, then click Done.
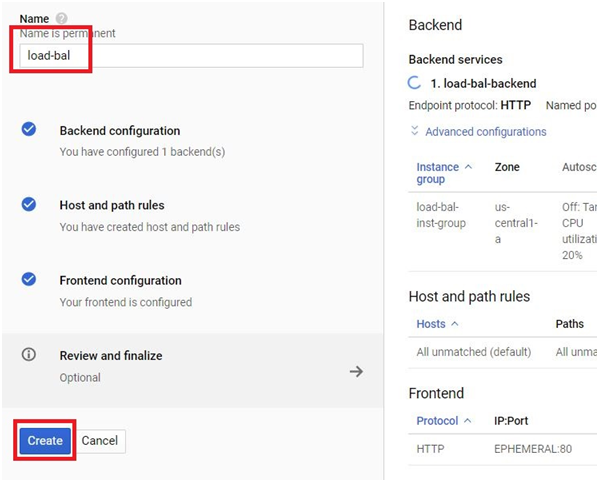
- Give the load balancer a name and click Create.
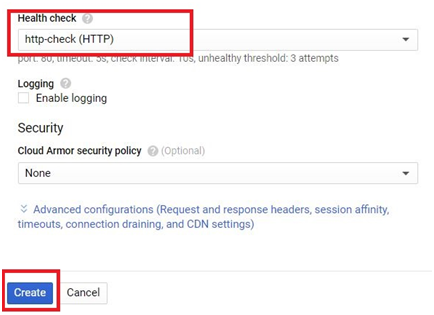
Then Click Create
Step 13: Check That It Works
After a few minutes the load balancer appears in the list. Open the load balancer and look at its backend. When every machine shows as healthy, paste the load balancer address into a browser. If you used the hostname tip from Step 3, refresh several times and watch the page change between machines.
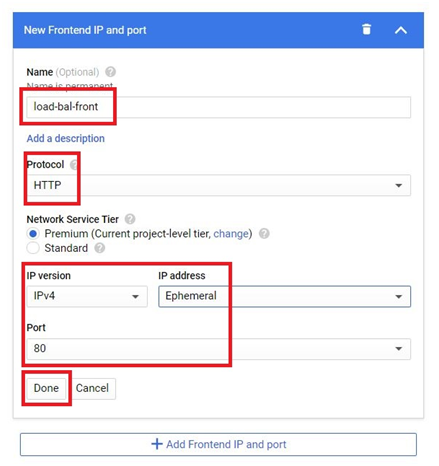
Give Load name for load balancing. Click Create.
The Load balancer will be created
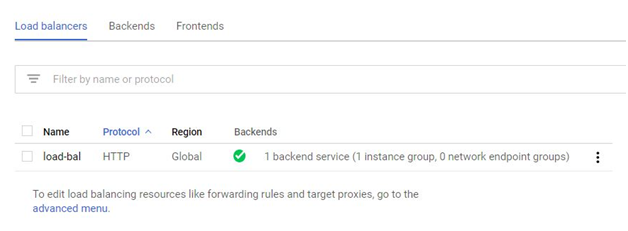
A new load balancer can take several minutes to start answering, so give it a little time before you assume something is wrong.
Load Balancing Inside Google Kubernetes Engine
Because this page lives in the Kubernetes section, here is how the same idea works in GKE. You do not click through the console. You describe what you want in Kubernetes and GKE builds the load balancer for you.
- Service of type LoadBalancer.GKE creates a Google Cloud passthrough network load balancer in front of your Pods, and the Service gets an external IP address.
- For HTTP and HTTPS traffic with paths and hostnames, an Ingress creates an Application Load Balancer, the same family you built above.
A minimal Service looks like this:
apiVersion: v1
kind: Service
metadata:
name: hello-lb
spec:
type: LoadBalancer
selector:
app: hello
ports:
– port: 80
targetPort: 8080
Apply it and wait for the external address:
kubectl apply -f service.yaml
kubectl get service hello-lb –watch
Two settings are worth knowing. The Local value of externalTrafficPolicy keeps the real client IP address and sends traffic only to nodes that have a ready Pod. The Cluster value spreads traffic more evenly but hides the client address. For a private service, an annotation turns the Service into an internal load balancer.
Common Mistakes to Avoid
- Forgetting the health check firewall ranges.The backends show as unhealthy and users get errors.
- Leaving out the named port.Without the http name on port 80, the backend service has nothing to send traffic to.
- Expecting it to work instantly.New load balancers can take several minutes to start answering.
- Opening the firewall to everyone for good.The wide open range is for a test. Narrow it for real workloads.
- Copying commands with curly quotes or a long dash.Pasting from a web page can change characters in the startup script. Paste into a plain text editor first.
- Forgetting to clean up.The load balancer, forwarding rule, instances and reserved addresses all bill until you remove them.
You have now built a working HTTP load balancer with health checks and autoscaling. From here, try adding HTTPS with a certificate or put the same backend behind a GKE Ingress and compare how each feels to operate.






