When to use load balancing
Prerequisites
GCP account
Open Console.
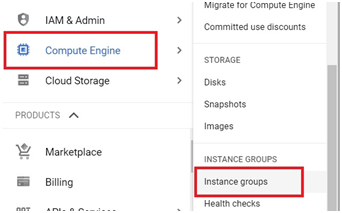
Menu > Compute Engine > Instance Groups
![](https://prwatech.in/blog/wp-content/uploads/2021/05/image-467.png)
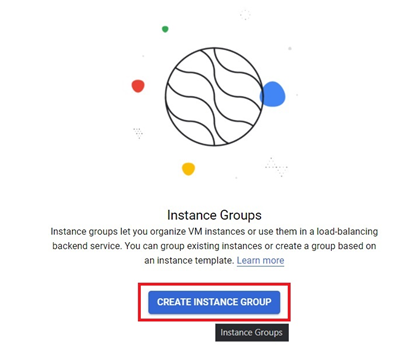
Click on Create Instance Group
![](https://prwatech.in/blog/wp-content/uploads/2021/05/image-468.png)
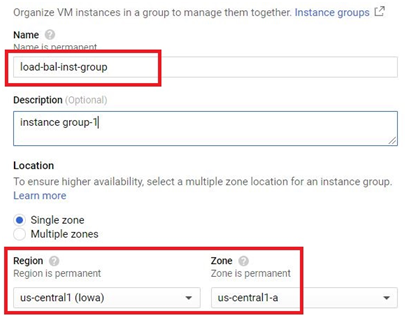
Give a name for instance group.
Select the Region and Zone
![](https://prwatech.in/blog/wp-content/uploads/2021/05/image-469.png)
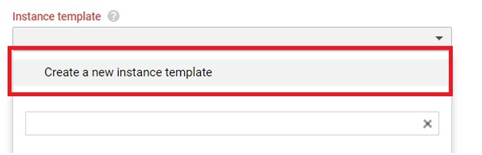
In Instance template, Click on Create a new Instance Template
![](https://prwatech.in/blog/wp-content/uploads/2021/05/image-470.png)
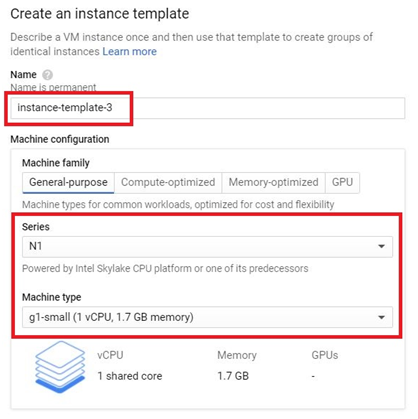
Give a new Instance Template.
Choose the Specification for instance template.
![](https://prwatech.in/blog/wp-content/uploads/2021/05/image-471.png)
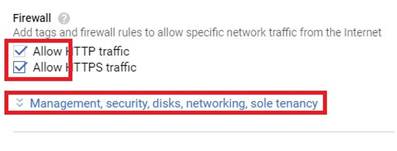
In firewall, Tick Allow.
Click Management, security, disks, networking, sole tenancy
![](https://prwatech.in/blog/wp-content/uploads/2021/05/image-472.png)
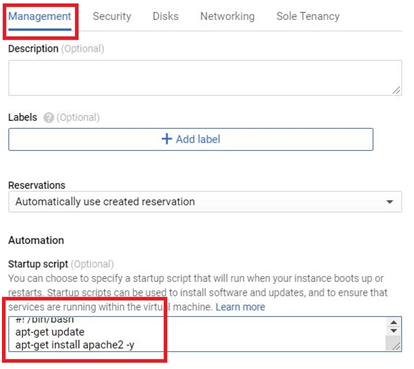
In management, Copy and paste the below code in Startup script.
#! /bin/bash
apt-get update
apt-get install apache2 -y
![](https://prwatech.in/blog/wp-content/uploads/2021/05/image-473.png)
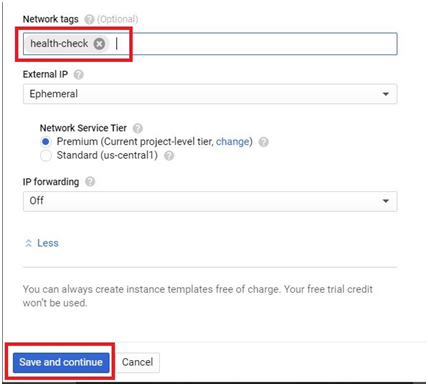
In networking, Give the network tag.
![](https://prwatech.in/blog/wp-content/uploads/2021/05/image-474.png)
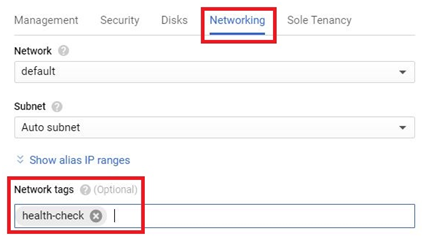
Then Click Save and Continue
![](https://prwatech.in/blog/wp-content/uploads/2021/05/image-475.png)
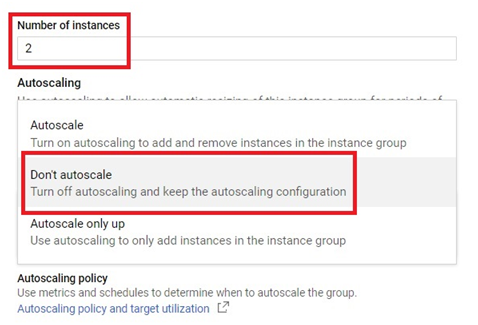
In Autoscaling, Select Don’t AutoScale
![](https://prwatech.in/blog/wp-content/uploads/2021/05/image-476.png)
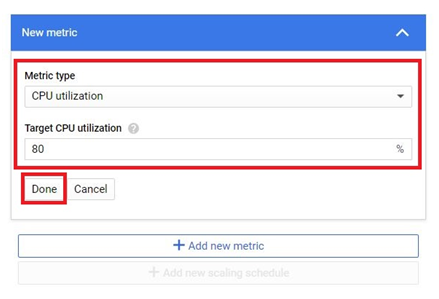
Give the metric type as CPU Utilization and give the target percentage.
Click Done.
![](https://prwatech.in/blog/wp-content/uploads/2021/05/image-477.png)
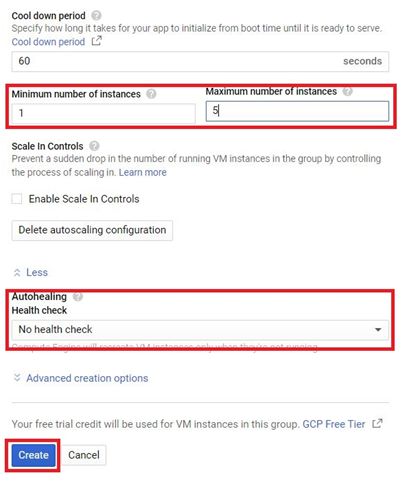
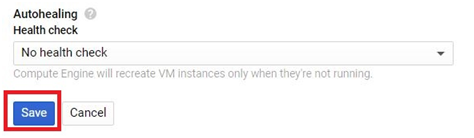
Give the minimum and maximum number of instances. In autohealiing, Give No health Check.
Then Click Create.
![](https://prwatech.in/blog/wp-content/uploads/2021/05/image-478.png)
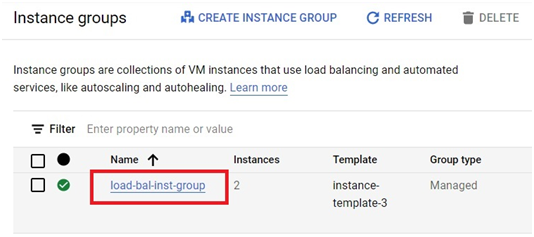
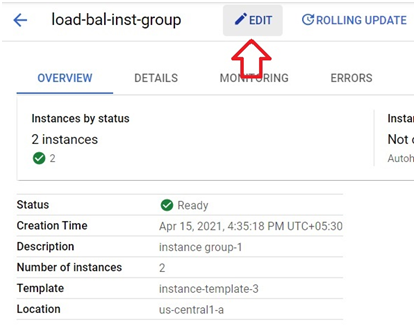
The Instance Group will be created. Click the instance group which is created.
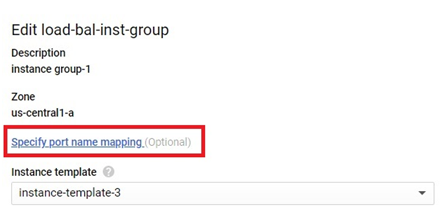
![](https://prwatech.in/blog/wp-content/uploads/2021/05/image-479.png)
Edit.
![](https://prwatech.in/blog/wp-content/uploads/2021/05/image-480.png)
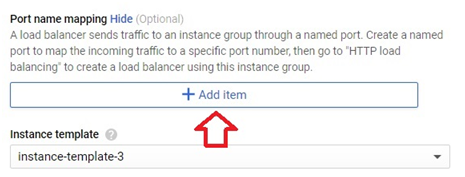
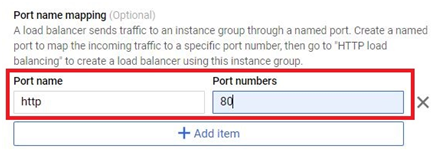
Click on Specify port name mapping.
![](https://prwatech.in/blog/wp-content/uploads/2021/05/image-481.png)
Click on Add item.
![](https://prwatech.in/blog/wp-content/uploads/2021/05/image-482.png)
Give the port name as http and port number as 80.
![](https://prwatech.in/blog/wp-content/uploads/2021/05/image-483.png)
Save.
![](https://prwatech.in/blog/wp-content/uploads/2021/05/image-484.png)
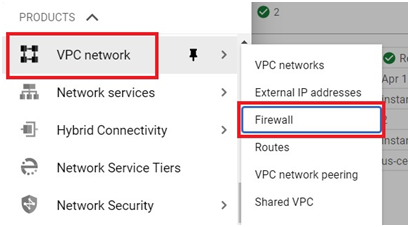
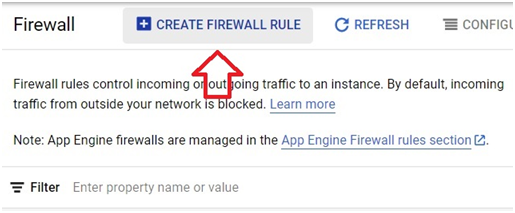
Click on VPC network > Firewall
![](https://prwatech.in/blog/wp-content/uploads/2021/05/image-485.png)
on create Firewall.
![](https://prwatech.in/blog/wp-content/uploads/2021/05/image-486.png)
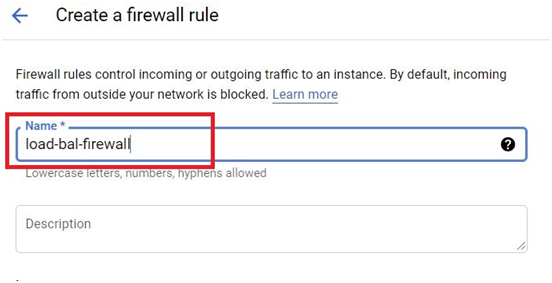
Give the name for firewall
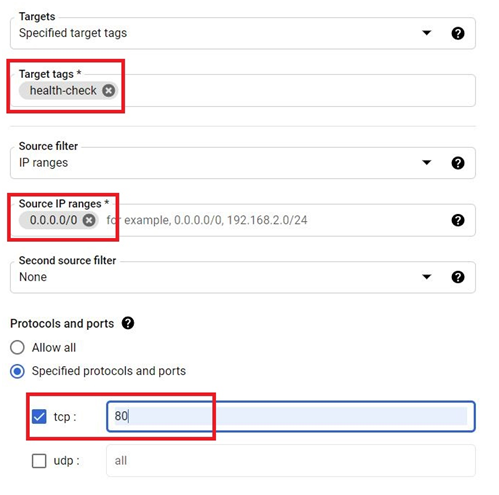
![](https://prwatech.in/blog/wp-content/uploads/2021/05/image-487.png)
the target tags.
Give the Source IP ranges
Select the tcp and give port number as 80
![](https://prwatech.in/blog/wp-content/uploads/2021/05/image-488.png)
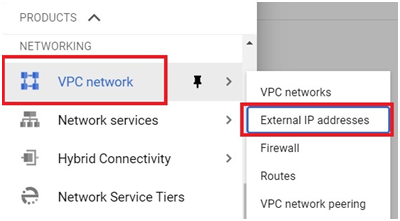
Select VPC network > External IP address
![](https://prwatech.in/blog/wp-content/uploads/2021/05/image-489.png)
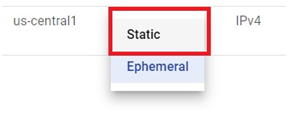
In the Type, Click on Ephemeral.
![](https://prwatech.in/blog/wp-content/uploads/2021/05/image-490.png)
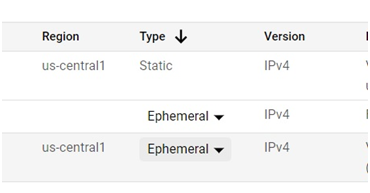
Change it into static.
![](https://prwatech.in/blog/wp-content/uploads/2021/05/image-491.png)
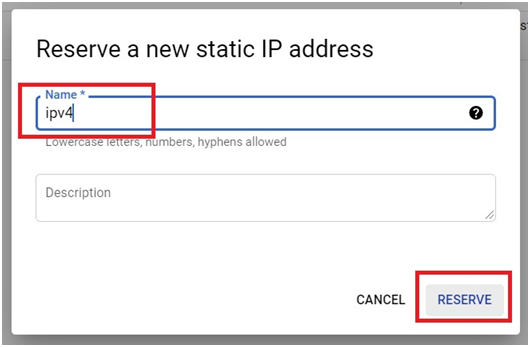
Give the name for static and Click reserve.
![](https://prwatech.in/blog/wp-content/uploads/2021/05/image-492.png)
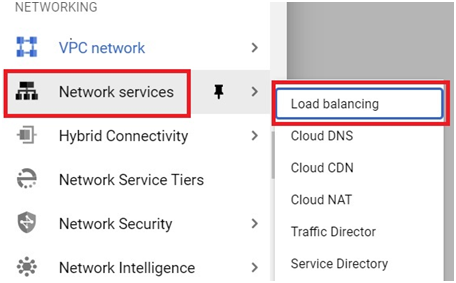
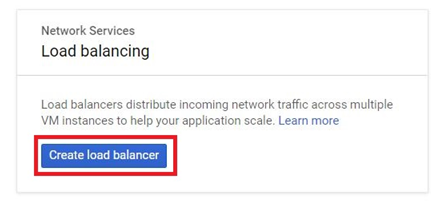
Click on network services > Load balancing
![](https://prwatech.in/blog/wp-content/uploads/2021/05/image-493.png)
Click on Create load balancer
![](https://prwatech.in/blog/wp-content/uploads/2021/05/image-494.png)
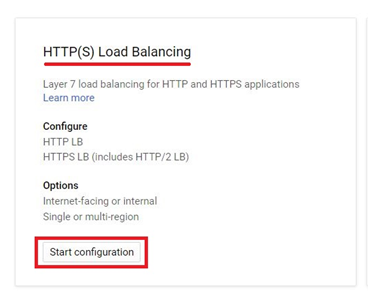
In HTTP load balancing, Click on Start configuration
![](https://prwatech.in/blog/wp-content/uploads/2021/05/image-495.png)
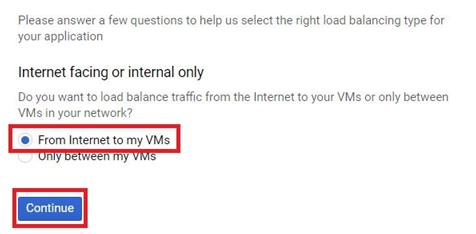
Select From internet to my VM’s and Click Continue.
![](https://prwatech.in/blog/wp-content/uploads/2021/05/image-496.png)
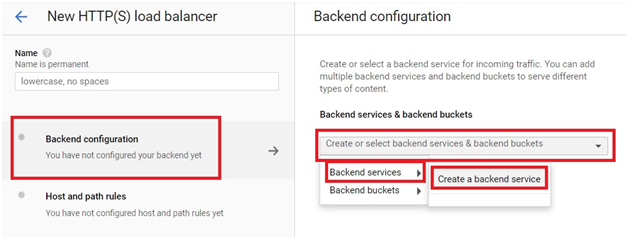
In the Backend Configuration. Select Backend Services > Create a backend service.
![](https://prwatech.in/blog/wp-content/uploads/2021/05/image-497.png)
Give the name for backend. Select Instance Group in backend type.
![](https://prwatech.in/blog/wp-content/uploads/2021/05/image-498.png)
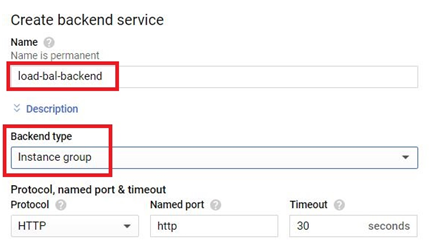
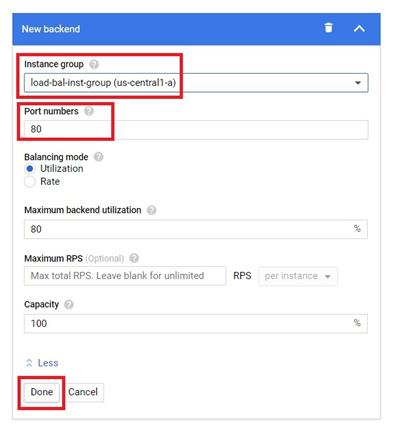
Select the created Instance Group. Give the port number as 80.
Click Done.
![](https://prwatech.in/blog/wp-content/uploads/2021/05/image-499.png)
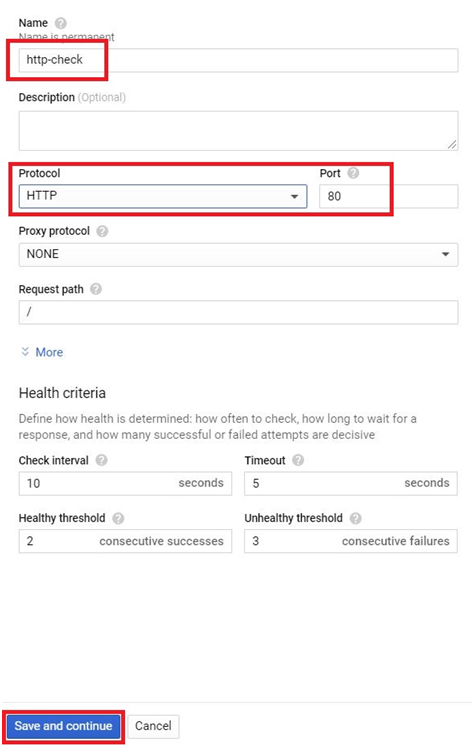
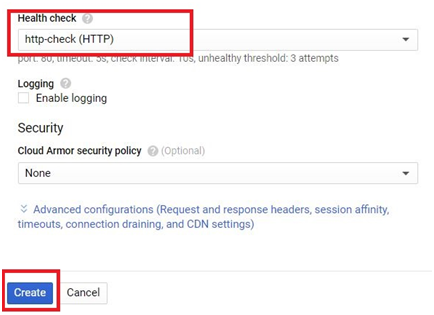
Click the dropdown in Health Check
Give the name for health check.
Select the protocol as HTTP and give port number as 80.
Click Save and Continue.
![](https://prwatech.in/blog/wp-content/uploads/2021/05/image-500.png)
Then Click Create
![](https://prwatech.in/blog/wp-content/uploads/2021/05/image-501.png)
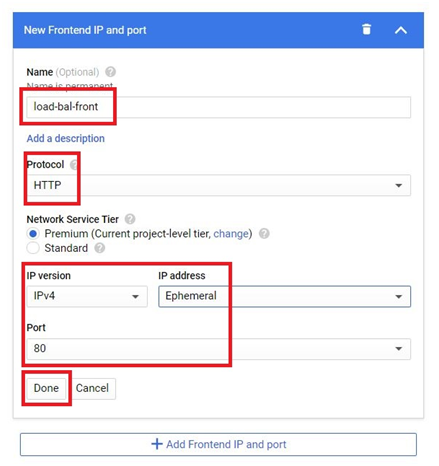
In frontend Configuration, Give the name.
Select the protocol as HTTP. Click Done.
![](https://prwatech.in/blog/wp-content/uploads/2021/05/image-502.png)
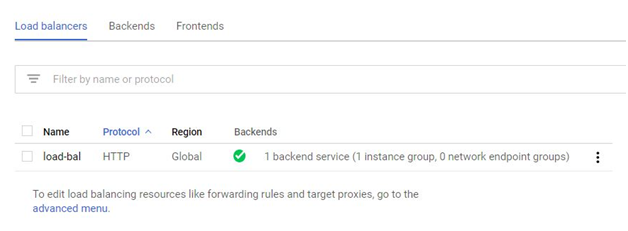
Give Load name for load balancing. Click Create.
![](https://prwatech.in/blog/wp-content/uploads/2021/05/image-504.png)
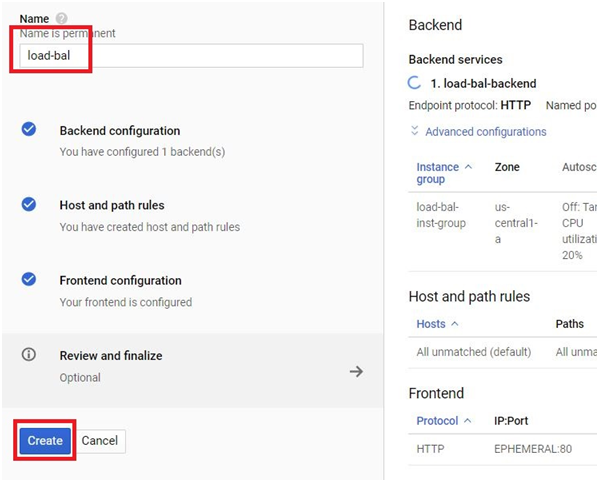
The Load balancer will be created
![](https://prwatech.in/blog/wp-content/uploads/2021/05/image-505.png)