Sole Tenant nodes
Sole Tenant Nodes in Google Cloud
On Compute Engine, your virtual machines normally share physical servers with other customers’ VMs. A sole tenant node is a physical server reserved for your project alone, so only your project’s VMs run on it. People use them for compliance rules that require dedicated hardware, for software licences that are tied to physical cores or sockets, and for performance that must not be affected by neighbours.
The trade off is cost and complexity. You pay for the whole server whether or not it is busy, and you have to decide how it is scaled and how it behaves during maintenance. So the choices in the creation steps, autoscaling and maintenance policy, deserve more thought than the original page gave them.
This walks through creating a node template and a node group in the console, explains what each choice does, then shows how to place a VM on the group and what the whole thing costs.
Three Terms to Know
- Node template. A regional resource that defines what each node will be, such as its node type, and optionally local SSDs, GPUs, and node affinity labels. When you create a node group from it, the template’s properties are copied to each node.
- Node group. A set of identical sole tenant nodes in one zone, created from a node template.
- Node affinity labels. Labels that let you tie a VM to particular nodes or node groups. You can add custom labels on a node template, but not on a node group.
Prerequisites:
- A Google Cloud account with billing enabled. The Enabling Billing guide in this series covers that.
- Quota and capacity for the node type you want in the zone you want.
Complete Guide to Sole Tenant Nodes
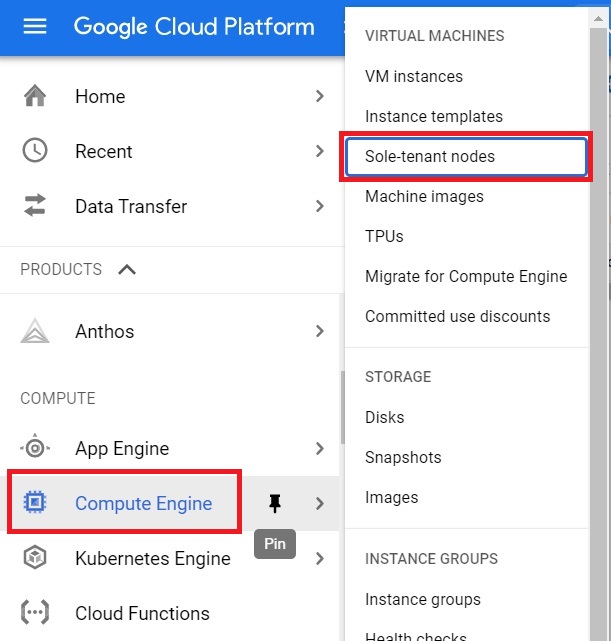
Step One: Open Sole Tenant Nodes
Open the console, Select Compute Engine > Select sole-tenant nodes.
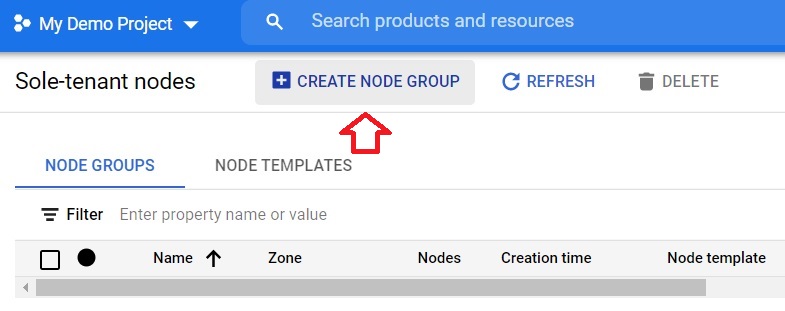
Step Two: Create a Node Group
Click Create node group.
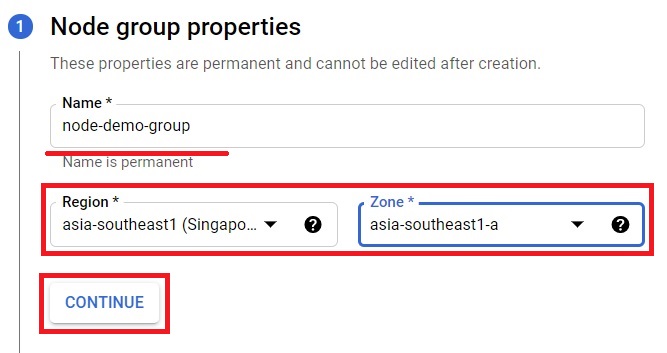
Step Three: Name the Group and Choose a Region and Zone
Give the node group a name, choose a region and a zone, then click Continue. The original page said range instead of region.
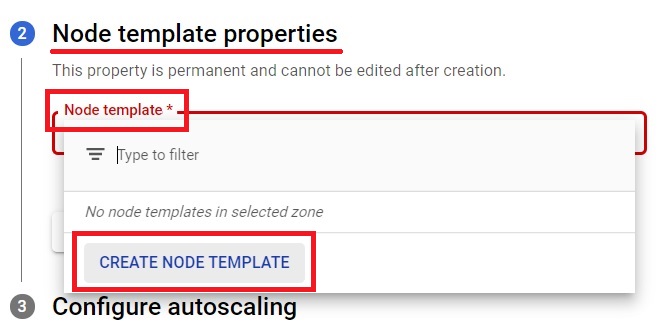
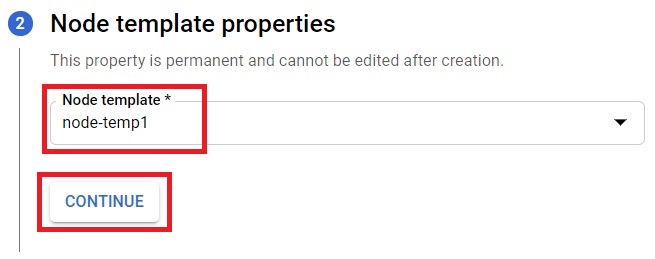
Step Four: Choose or Create a Node Template
In the node template properties, select a node template you have already created. If you have not, click Create node template.
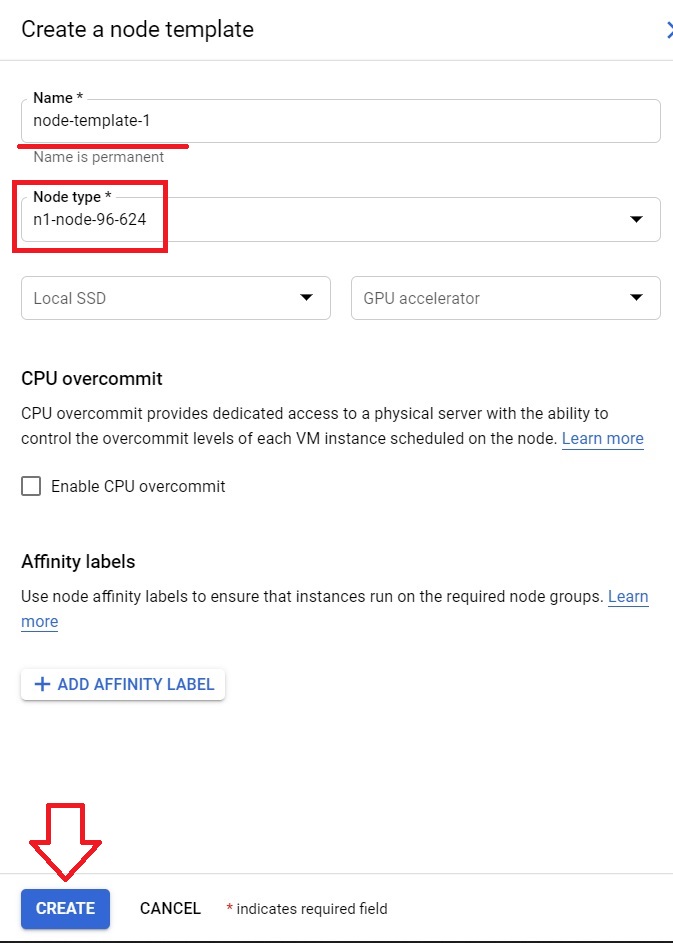
Step Five: Create a Node Template
Give the template a name and choose a node type, which sets the CPU family and how many vCPUs and how much memory each node has. You can also add local SSDs and GPUs, and node affinity labels if you plan to target the group from VMs. Click Create.
Step Six: Select the Template
The node template is created. Select it and click Continue.
Step Seven: Configure Autoscaling
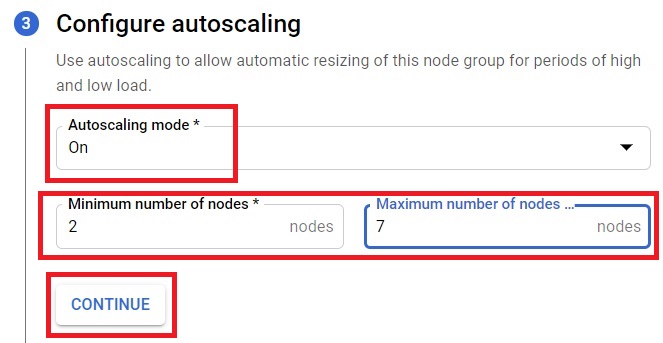
Choose how the number of nodes is managed, and set the minimum and maximum if autoscaling is on. The modes are explained below. Click Continue.
Step Eight: Choose the Maintenance Policy and Create
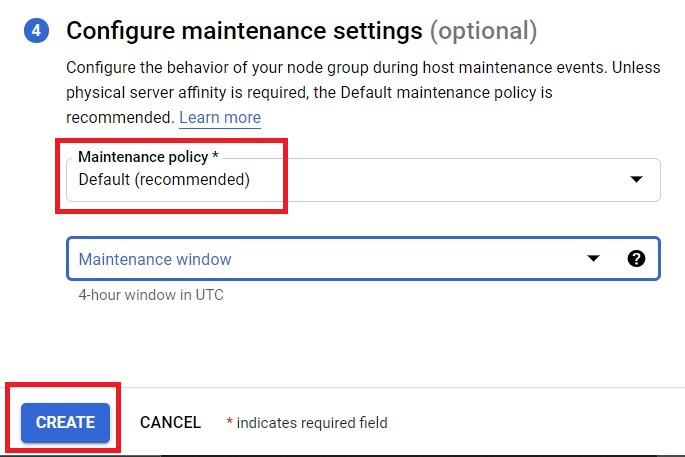
Choose the maintenance policy, explained below, then click Create. The node group is created.
Autoscaling Modes
- You set the number of nodes and it stays there.
- The group grows and shrinks between your minimum and maximum as VMs need space.
- Only scale out. The group grows when VMs need room, but never removes empty nodes. Google recommends it for workloads that only grow or that need physical server affinity, and you must use it if the group uses the Migrate within node group maintenance policy.
Google’s best practices advise avoiding scale in autoscaling, since removing nodes can change the hardware your VMs run on.
Maintenance Policies
The maintenance policy decides what happens to VMs when Google needs to do maintenance on a host.
- VMs live migrate to another node. This gives the best availability, and Google recommends it unless you need to keep VMs on the same physical server.
- Restart in place. VMs are stopped and restarted on the same node. Use it only if you need physical server affinity, for example for a licence tied to a particular server. It does not use live migration, so expect downtime.
- Migrate within node group. VMs live migrate to another node in the same group, which means Google holds back some nodes for this purpose. Those spare nodes add cost, and maintenance windows are not supported with this policy.
Placing a VM on Your Node Group
A node group does nothing on its own. A VM only runs on it if you ask for it. When you create the VM, open its Sole Tenancy settings. The console shows the node affinity labels assigned automatically, and you use Browse to choose the node group you want. If you added custom labels to the node template, you can target the group with those instead. Without this step, the VM runs on ordinary shared infrastructure and you are paying for a node that sits empty.
What Sole Tenant Nodes Cost
When you create a node, billing begins for all of its vCPUs and all of its memory, plus a sole tenancy premium of 10 percent of the cost of those resources. This is true whether or not any VM is running on the node. Discounts such as committed use can apply to the vCPU and memory, but the premium is still charged.
Google’s pricing page lists current node types at roughly 10 US dollars an hour or more, with the largest above 25, so a single node can cost thousands of dollars a month. Check the page for the node type you choose. That makes a forgotten node group an expensive mistake, and it is why autoscaling mode and keeping empty nodes need care. Delete a practice node group as soon as you finish. The Creating and Deleting a Budget guide in this series explains why a budget alert will not stop that spending for you.
Common Mistakes to Avoid
- Creating a node group and assuming your VMs will use it. They need node affinity to be placed on it.
- Leaving a node group running when no VMs are on it. You pay for the whole node anyway.
- Choosing Restart in place by default. Use it only when you need the same physical server, since it means downtime during maintenance.
- Using scale in autoscaling for licence bound workloads. Removing nodes can change the hardware your VMs run on.
- Treating dedicated hardware as a replacement for access control. IAM still decides who can do what.
That covers creating a sole tenant node group, the choices that matter, and what dedicated hardware costs. To go further, explore Prwatech’s Google Cloud training program, which includes placement assistance.






