Creating an Instance using Developers Console
Creating a VM Instance in the Google Cloud Console
A VM instance is a virtual machine running on Compute Engine, Google Cloud’s service for renting computers by the hour. It is where you run applications, host websites, and practise almost everything else in this series, which is why creating one is usually the first hands on task in Google Cloud.
The creation form looks simple, but it asks you to make several choices that affect cost, speed, and security. Where the VM runs, how big it is, what disk it boots from, and what traffic it accepts all have consequences. And a VM bills for every hour it exists, so it helps to know which choices fall under the free tier.
This walks through creating a VM in the console from the first click, with the important choices explained at the steps where you make them, then covers connecting to it, what it costs, and how to clean up.
Prerequisites:
- A Google account and a Google Cloud project with billing enabled. The Google Cloud Platform and Project Creation guide and the Enabling Billing guide in this series cover both.
Step by Step Process of Creating a VM Instance
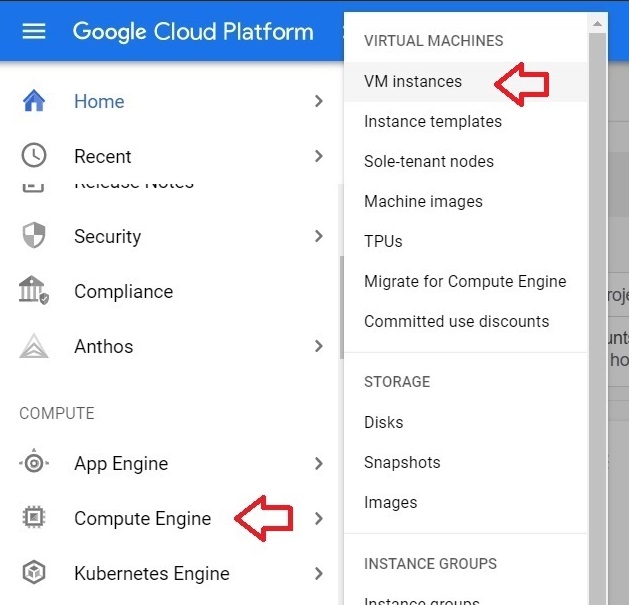
Step One: Open VM Instances
Open Cloud Console. To create a new Instance.
click Menu> Computer Engine> VM Instances.
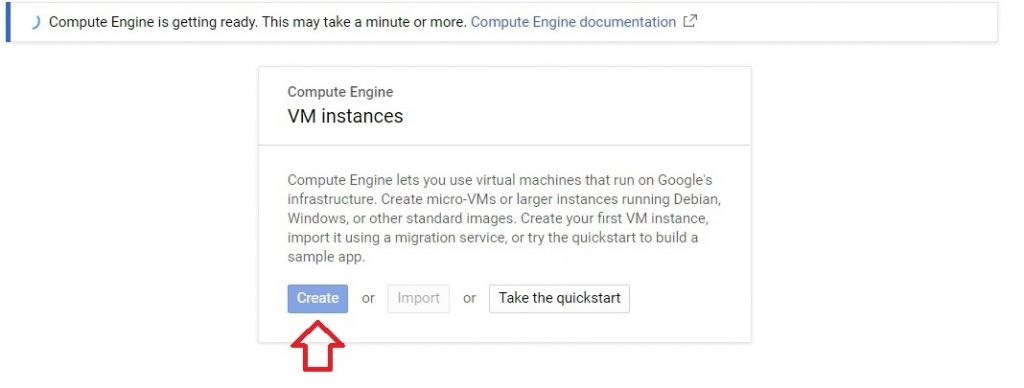
Step Two: Click Create
Click Create instance.
Step Three: Name the VM and Choose Where It Runs
Give the instance a name, then choose a region and a zone, and configure the machine. The name can use lowercase letters, numbers, and hyphens, and must start with a letter. The Creating an Instance Using Cloud Shell guide in this series covers the naming rules. Each machine configuration has its own price, and the form shows an estimate on the right side of the window, so look at it before you go on.
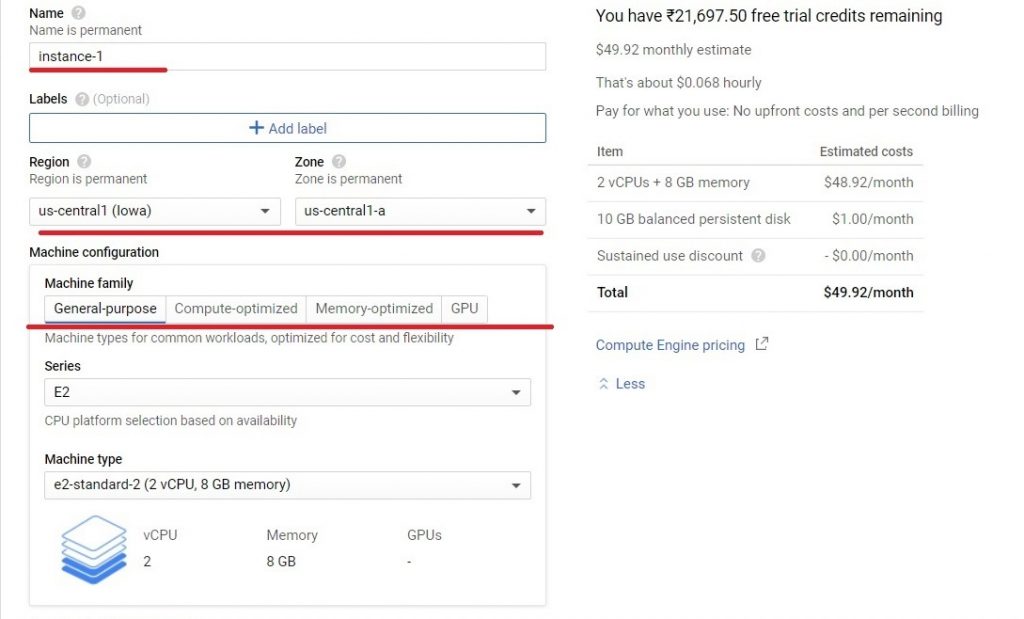
Choosing a Region and Zone
The console fills in a default region and zone for you, based on where your project was created. You can change them. Pick a location near the people or systems that will use the VM, since distance adds delay, and check the price estimate, because the same machine can cost different amounts in different regions. Not every machine type is available in every zone.
Once the VM exists, you cannot change its region or zone by editing it. You can move it, but it takes several steps, which is why it is worth choosing carefully. The Creating a Machine Image guide in this series covers the method Google describes.
The Free Tier
Google’s Compute Engine free tier gives you one e2-micro VM instance per month, up to 30 GB of standard persistent disk storage, and up to 1 GB of outbound data transfer per month. The free e2-micro applies only in certain US regions, which Google’s free tier documentation lists as Oregon, Iowa, and South Carolina. To use it, choose one of those regions, the e2-micro machine type, and a standard persistent disk of up to 30 GB. Free tier terms change, so check Google’s current documentation before you rely on it.
Step Four: Find the Boot Disk, Firewall, and Create Button
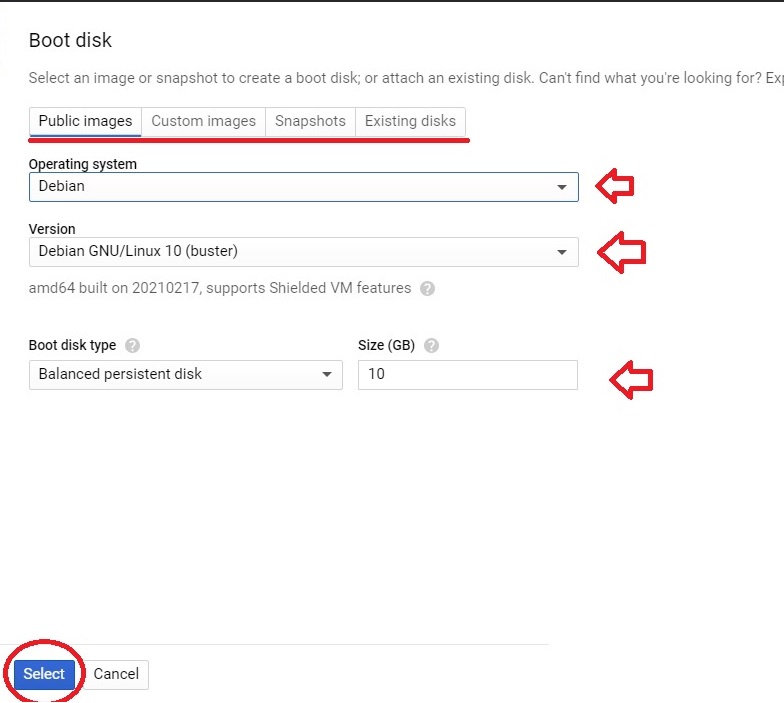
Scroll down the form. The boot disk section has a Change button, and below it are the firewall options and the Create button. Do the boot disk first by clicking Change. The original page mixed these steps together.
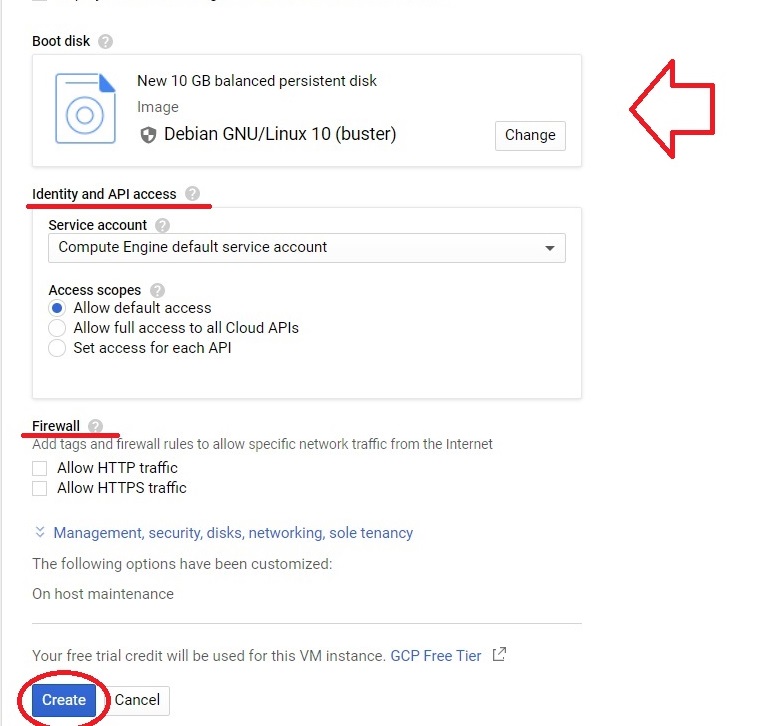
Step Five: Choose the Boot Disk
In the boot disk window, choose the operating system and its version, the boot disk type, and the size. Then click Select. A typical default for a small test VM is a Debian image and a 10 GB balanced persistent disk. The disk type affects both speed and price, and only a standard persistent disk counts towards the free tier. Everything chosen here becomes the VM’s first disk.
The Firewall Options
Back on the form, below the boot disk, you can tick Allow HTTP traffic or Allow HTTPS traffic. Ticking one automatically creates a firewall rule that opens that port to traffic from the internet, port 80 for HTTP. Only tick them if the VM will run a web server. Leave them unticked for a VM you will only reach by SSH. The Creating VPC Network guide in this series covers networks and firewalls.
Identity and API Access
Further down the form, under the identity and API access settings, the VM runs as a service account, which decides what it can do in your project. The default account may have broader access than the VM needs, so for anything beyond a practice VM, consider choosing a narrower one. The GCP Service Account guide in this series explains why.
Step Six: Create the VM
Click Create. After a short wait, the instance appears in the VM instances list, with a status showing that it is running.
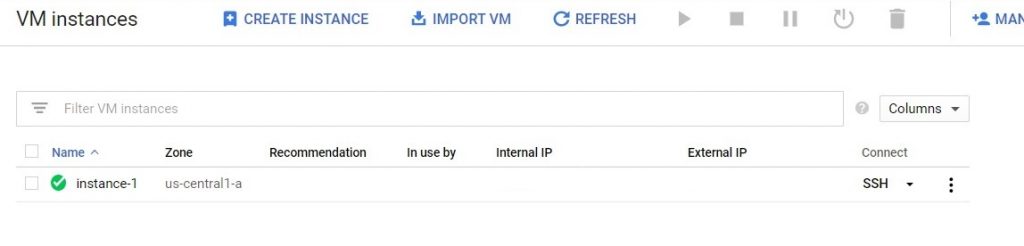
After the VM is Running
- Click SSH next to the VM in the list to open a terminal in your browser. The Creation of SSH Key Using PuTTY guide in this series covers connecting from your own computer.
- Check the cost. The VM bills from the moment it is created. A stopped VM generally stops billing for compute, though its disk still costs money.
- Delete it when you finish. The Deleting an Instance Using the Developers Console guide in this series explains what deletion removes and what can keep billing, such as a disk set to keep and a reserved static IP address.
- Set a budget alert. The Creating and Deleting Budget guide in this series explains why a budget only notifies you and does not stop spending.
Common Mistakes to Avoid
- Choosing a region without checking the price estimate or the free tier regions.
- Ticking the HTTP and HTTPS firewall options for a VM that does not run a web server.
- Assuming the region and zone can simply be edited later. They cannot, though the VM can be moved.
- Using a balanced or SSD boot disk and expecting it to be covered by the free tier. Only standard persistent disk counts.
- Leaving a practice VM running after you finish.
That covers creating a VM in the Google Cloud console, the choices that matter, and how to keep the cost under control. To go further, explore Prwatech’s Google Cloud training program, which includes placement assistance.






