Adding Team Members in GCP
Adding Team Members and Google Groups in Google Cloud
Giving someone access to a Google Cloud project means granting a principal a role on that project. A principal can be a person’s Google Account, a service account, a Google group, or a whole domain, and the role decides what that principal is allowed to do.
For one or two people, granting roles directly is fine. For a team, Google’s own guidance is to grant roles to groups instead of individual users, because it is easier to change who is in a group than to edit the project’s access list every time someone joins or leaves. Every member of a group inherits the roles granted to it, so access follows team membership.
This walks through granting a role to a person from the console, including the optional condition step, then covers why groups are the better habit, how to create and manage a group, and how to grant a role to it.
Step by Step process of Adding Team Member and Goups in GCP
Step One: Open IAM
Open the console, to add team members click on the Menu > IAM & Admin > IAM
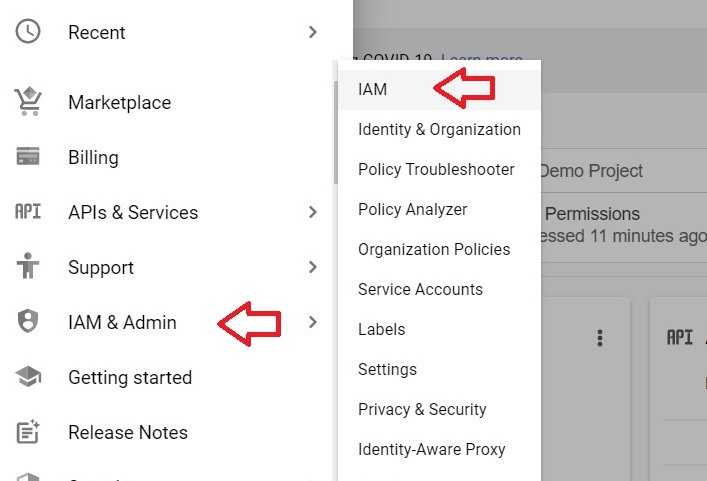
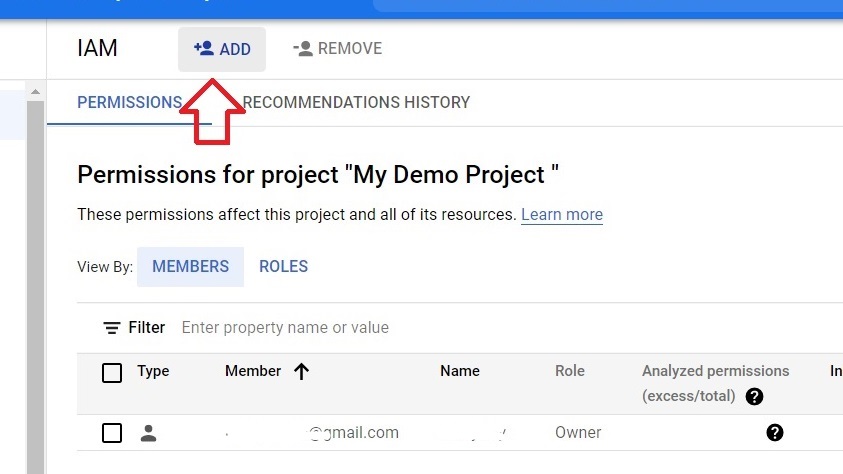
Step Two: Click Grant Access
Click Grant access. Older versions of the console showed this button as Add, and the screenshot below may still show it that way.
Step Three: Enter the Principals
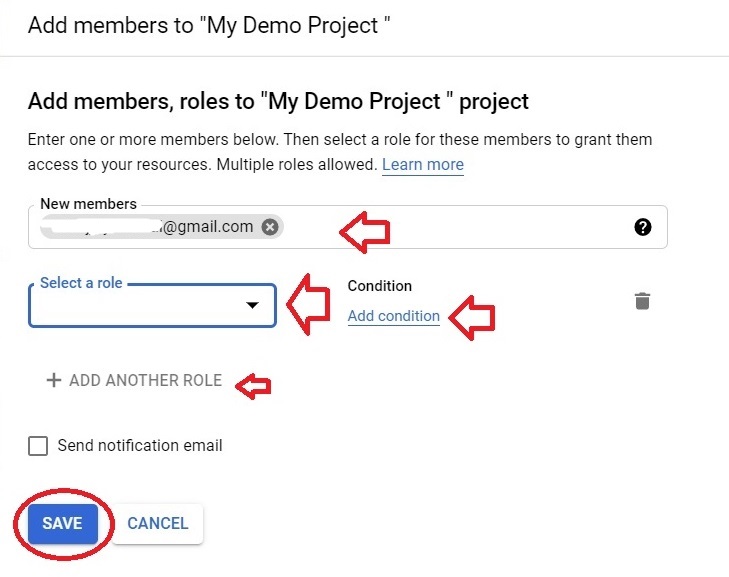
In the New principals field, enter the email address of each person you want to add. You can add several at once. A principal can be a Google Account, a service account, a Google group, or a Google Workspace or Cloud Identity domain, which covers business email addresses as well as personal Gmail.
Step Four: Select a Role
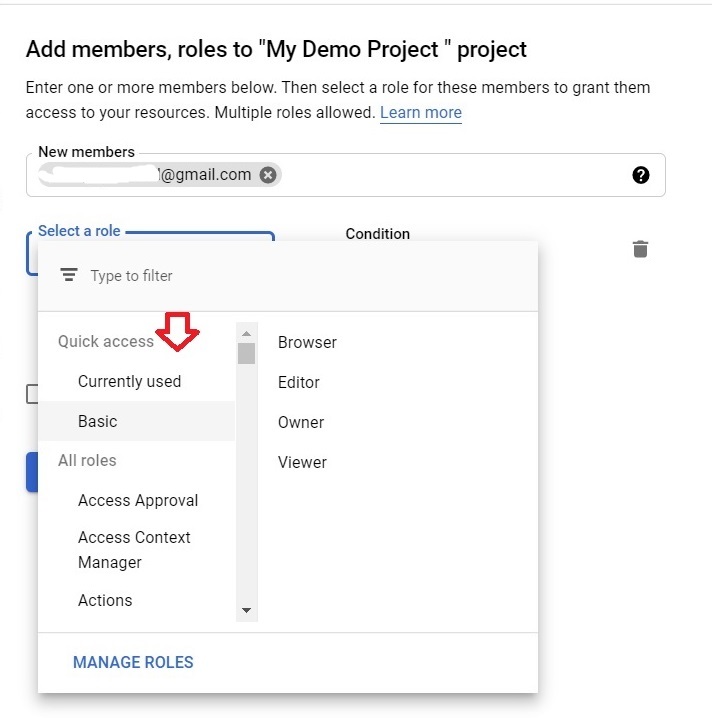
Choose the role from the Select a role menu, either by browsing or by typing its name. Click Add another role if the same principal needs more than one. In production, Google advises against granting basic roles such as Owner or Editor unless there is no alternative, and recommends the most limited predefined or custom role that does the job. The IAM Roles guide in this series covers that choice.
Step Five: Add a Condition, if You Need One
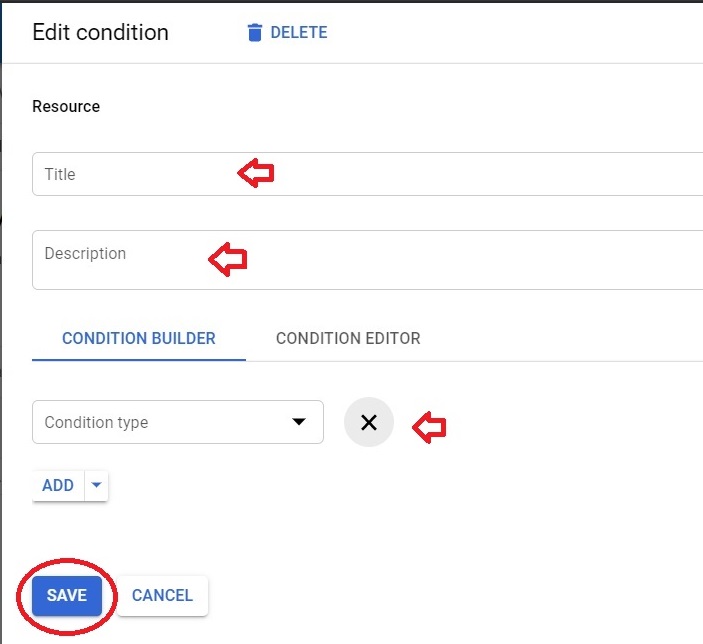
A condition makes the role apply only when the condition is true, for example only until a certain date. Click Add IAM condition and enter a title, which is required, and a description, which is optional. Both are only labels to help you identify the condition later. Then build the condition using either the Condition builder, which is an interactive form, or the Condition editor, which takes a written expression. For temporary access, the Expiring Access condition type sets a date and time after which the role stops applying. Click Save when you are finished.
Some Google Cloud services do not accept conditions in allow policies, so a condition that works on one resource may not be available on another.
Grant Roles to Groups Instead of Individuals
- Easier changes. Adding or removing a person from a group changes their access everywhere that group has a role, without touching the project’s access list.
- Less clutter. A group counts as a single principal however many people are in it.
- Room to grow. Each access list can hold up to 1,500 principals, and up to 250 of them can be groups, domains, or Google Workspace accounts. Granting to individuals one by one makes a larger team more likely to run into the 1,500 limit.
Creating and Managing a Google Group
For an organization, you can create and manage groups directly in the Google Cloud console.
- Open the Groups page in the Google Cloud console and click Create.
- Enter the group’s details and create it.
- To add people, click Add member, enter the person’s email, and choose their Google Groups role.
One detail worth knowing is that a person inherits every IAM role granted to the group regardless of their Google Groups role, so being a plain member and being a group owner makes no difference to what Google Cloud lets them do.
Permissions to create and manage groups are controlled by Google Workspace rather than by IAM, so you need the appropriate group permissions as well as access to the organization. Some group features, such as moderation settings, joining rules, and permissions for posting, cannot be managed from the console and need to be changed in Google Groups itself. Groups can also be created in the Google Admin console, or by using the Cloud Identity Groups API or the gcloud command line.
Granting a Role to the Group
Follow Steps One to Four again, but in the New principals field enter the group’s email address instead of a person’s. Everyone in the group now has that role on the project.
How Long Changes Take
Access changes do not apply instantly. Google’s documentation says policy changes generally take effect within about two minutes, though in some cases it can take longer. If someone cannot see a resource right after you grant access, wait a few minutes before changing anything else.
Common Mistakes to Avoid
- Granting roles one person at a time for a whole team. Use a group, and manage access by managing membership.
- Granting Owner or Editor out of convenience in production. Choose the narrowest predefined or custom role that covers the work.
- Assuming a person’s role inside the group limits their Google Cloud access. A member inherits every role granted to the group either way.
- Adding a condition and assuming it will work on every service. Some do not accept conditions.
- Expecting access to work the moment you click Save. Allow a few minutes for the change to apply.
That covers granting access to people and groups in Google Cloud, and why groups are the better default for teams. To go further, explore Prwatech’s Google Cloud training program, which includes placement assistance.






